Configuring a Site Sync#
Site Sync provides replication of Cloud Snapshots to a separate VergeOS system; this provides off-site data backup facilitating disaster recovery and business continuity.
Setting up a Site Sync Involves:#
- Network Configuration
- Creating Incoming Sync (on the receiving system)
- Creating Outgoing Sync (on the sending system/and registering with the receiving system)
- Specifying Snapshots to Sync and Retention on the Receiving System
- Configuring Sync Scheduling (optional)
- Creating a Repair Server (recommended)
Network Configuration#
Network Rules are necessary to translate incoming sync traffic to the vSAN. Note: These Rules are created at the Host level, not within a tenant.
To Configure 14201 PAT Rule for Sync traffic to the vSAN:#
(Create this rule once to accomodate all incoming syncs to this system.)
- Login to the receiving VergeOS system at the HOST level (not in tenant).
- Navigate to Networks.
- Click All Networks.
- Double-click on the Core Network to access its Dashboard.
- Click Rules on the left menu.
- Click New on the left menu.
-
Build a Rule with the following values:
#### Rule - Name (required): Should be something helpful for future administration - Action: Translate - Protocol: TCP - Direction: Incoming - Interface: Auto - Pin: No
#### Source - Type: Any/None (Highly recommend source locking this to a specific IP or subnet)Destination#
- Type: Custom
- Custom Filter: ui (This is a VergeOS keyword; it must be entered in lower case, exactly as noted)
- Destination Ports/Ranges: 14201
#### Target - Type: IP/Custom
- Target IP: ui (This is a VergeOS keyword; it must be entered in lower case, exactly as noted)
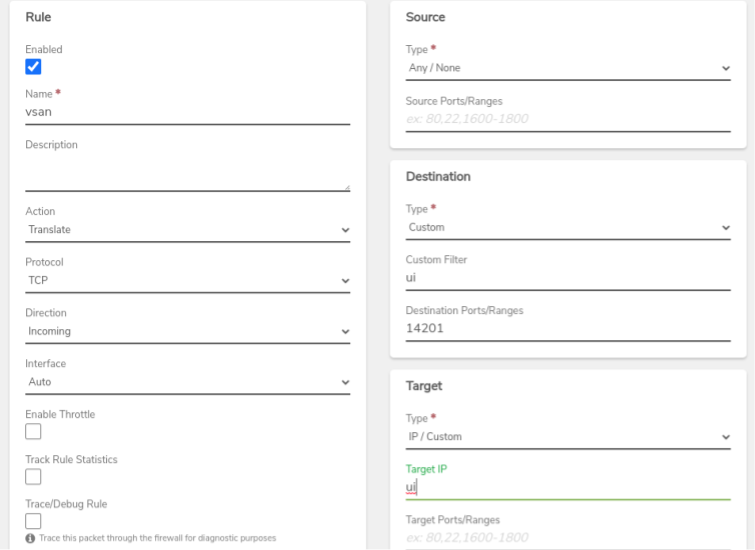
- Click Submit to save the new rule.
- The system will prompt to Apply Rules. Click Apply Rules on the left menu to put the rule into effect.
To Create PAT Rule for Incoming Sync:#
Incoming syncs will require PAT rules(s) for port 14201. Source-filtering based on incoming sync sources is recommended; for multiple sync sources, this can be done with a separate rule for each different source or by using a list of addresses (separated by commas) in the Source field within a single rule. {.is-info}
- Login to the receiving VergeOS system at the HOST level (not in tenant) .
- Navigate to Networks.
- Click Externals.
- Double-click the appropriate External Network.
- Click Rules on the left menu.
- Click New on the left menu.
-
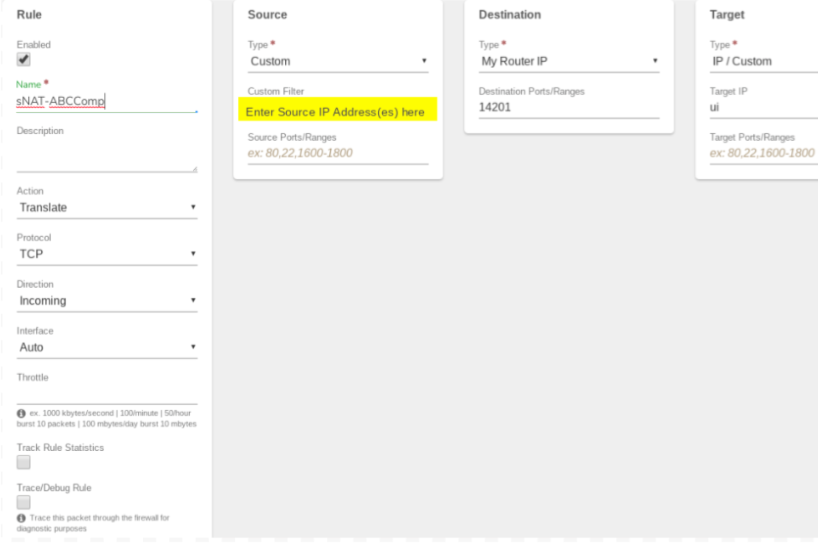
Build a rule with the following values:
Rule#
- Name(required): Use a name that will be helpful to future administration, for example: sNAT-customername
- Action: Translate
- Protocol: TCP
- Direction: Incoming
-
Interface: Auto
-
Type: Custom
- Custom Filter (recommended): Enter the IP address of the sending VergeOS system. If adding to an existing vSAN NAT rule, add the IP address making sure all addresses are separated by commas.
- Type: My Router IP
- Destination Ports/Ranges: 14201
- Type: IP/Custom
- Target: ui (This is a VergeOS keyword; it must be entered in lower case, exactly as noted)
-
Click Submit to save the new rule.
- Click Apply Rules on the left menu to put the rule into effect.
If the hostname/IP for receiving syncs is different than the vSAN address, there is a system setting to override: on the sync receiving system (host level): System ->Settings -> Edit vSAN Host. {.is-success}
Creating Incoming Sync#
Note: Incoming syncs may be auto-generated via cloud snapshot send/receive options when adding a site to the Sites Dashboard; when incoming/outgoing syncs are auto-created through adding sites, proceed to the Specifying Snapshots to Sync and Retention on the Receiving System section of this page to complete the site sync configuration.{.is-success}
To Configure the Incoming sync (creates authorization key)#
- Login to the receiving tenant system.
- From the main dashboard, click Backup / DR on the left menu.
- Click Incoming Syncs on the left menu.
- Click New on the left menu.
- Complete the Configuration for the Incoming Sync:
- Name (required): Provide a name that is helpful for administration, for example, the name of the site the sync will come from.
- Description: Optionally, more administrative information can be stored for this incoming sync.
- Force Tier: This can be defined to select a tier to which this sync will be directed, regardless of the originating Tier or any outgoing sync settings. (If the selected tier does not exist, the next appropriate tier will be used.) Leave this field set to -- None -- to allow the sync tier to be determined from the sending system.)
- URL of this system that the remote system will use to connect: This is the URL to the system you are currently logged into. This URL should be reachable from the sending system.
- vSAN Host: URL for the vSAN Host. This will default to the URL of the current (receiving) system.
- vSAN Port (Default 14201): This is the port used in the PAT rule that was created above.
- Minimum Snapshots (Default 1): This is the minimum number of snapshots that the system will retain regardless of retention periods defined.This helps prevent having all snapshots expire in the event of a prolonged outage or incorrect retention setup.
- Click Submit to save the Incoming Sync.
- The Incoming Syncs list appears. Double-click the sync just created. The dashboard for the incoming sync appears, along with a Registration Code (It may take a minute or two for the Registration Code to generate.).
- When the Registration key appears, click the Copy button to copy the key to the clipboard.
A Message will appear to indicate: Text copied to the Clipboard. This key will be needed when creating the coordinating outgoing sync on the sending system.
Creating Outgoing Sync#
Outgoing syncs may be auto-generated via cloud snapshot send/receive options when adding a site to the Sites Dashboard; if incoming/outgoing syncs were auto-created through adding sites, proceed to the Specifying Snapshots to Sync and Retention on the Receiving System section to complete the site sync configuration. {.is-success}
To Configure the Outgoing Sync Job and Register with the Receiving System:#
- Login to the Sending system. (This can be at HOST level or at tenant level depending on which system should be synchronized.)
- From the main dashboard, click Backup / DR.
- Click Outgoing Syncs on the left menu.
- Click New on the left menu.
- Paste the Registration Code copied above into the form and click Verify. If successful, a green Key Verified message will appear briefly.
- Complete the Sync Settings form:
- Name(required): This should be a name that is helpful for future administration.
- Description: Optionally, more administrative information can be stored for this outgoing sync.
- Remote URL: This field is auto-populated with the IP address/domain to the receiving system (extracted from the registration key); typically, this setting can be left at the auto-set value.
-
Click the Connect and Register button. If registration was successful, the Outgoing Syncs list appears with the new sync in the listing.
At this point, on the Receiving system (associated incoming sync dashboard), the key will indicate "--Used--" with a Registered date and time.{.is-success}
-
Double-click the outgoing sync in the list to access its dashboard.
Adjusting Sync Settings(optional)#
The sync is created; additional settings can be configured by clicking Edit on the left menu.
-
Retries
- Queue Retry Count (default 10): The number of times a queued snapshot will be attempted during the sync window. A value of 0 disables retries.
- Queue Retry Interval (default 1 minute): The time to wait in between each retry.
- Queue Retry Interval Multiplier (default enabled): When enabled, each retry interval is increased to the retry number multiplied by the spacing interval. (For higher Queue Retry Interval values, it may be best to disable this feature.)
-
Advanced
- Override Destination Storage Tier: (default = --None--) controls the tier(s) to which sync data will be aimed going into the destination. When set to the default (--None--) the sync will attempt to send snapshot data to the same tier (as its source) on the destination system. For example, data within the snapshot residing on tier2 on the sending server will attempt to send to tier2 on the receiving server; while snapshot data from tier4 will attempt to send to tier4 on the receiving system. When a specific tier(1-5) is selected here, the sync directs all data to the selected tier on the destination system.
Ultimately, the destination tier of sync data will depend on the existence of particular tiers on the receiving vSAN and/or any force tier setting employed on the incoming sync configuration on the receiving system.{.is-success}
-
Sync Threads: (default = 8) this default setting is optimized for typical WAN synchronization and normally won't need to be changed. However, threads can be increased to maximize sync bandwidth use; this can be helpful in situations of high latency on high bandwidth -OR- when synchronizing over much faster connections (e.g. over LAN), in order to fully take advantage of the available bandwidth.
Sync Threads set too high can have a negative impact on processor utilization; best practice is to increase setting incrementally from the default until the desired bandwidth target is reached. Typically, the setting should not be set to a number higher than the number of physical drives within a single node on the sending system. {.is-warning}
-
Send Throttle (default = 0 or no throttling): a setting other than 0 will set a max data flow for the sync.
-
Encryption(default enabled): can be disabled to allow for faster syncs.
Encryption should only be disabled when sync is not performed across public lines, for example: a sync from one system to another on the same LAN. {.is-warning}
-
Remote Minimum Snapshots (default = 0): Minimum number of snapshots to retain on the remote host. This helps prevent having all snapshots expire in the event of a prolonged outage.
Specifying Snapshots to Auto Sync Along with Remote Retention#
The Cloud Snapshot Profile determines the snapshot take and retention schedule for the entire local system (Cloud Snapshots include a complete recovery point of the entire VDC, including: VMs, networks, tenants, vSAN, NAS, etc.) These are the snapshots that can be selected for an automatic site sync. To change the profile used to control local system snapshots: System -> Cloud Snapshots > Select Snapshot Profile. For more information about Cloud Snapshots: see Cloud Snapshots and Restores Snapshots {.is-success}
Select Snapshots and Remote Retentions for Auto Sync#
- Navigate to Backup / DR.
- Click Outgoing Syncs on the left menu.
- Double-click the desired Outgoing Sync to access its dashboard.
- In the Auto Sync Configuration section, click the Add Item link.
The Configuration form will appear.
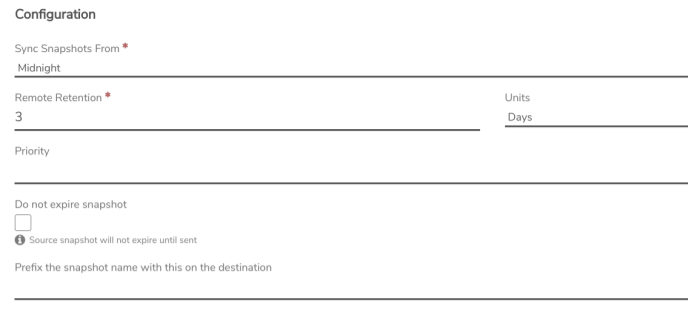
-
In the Sync Snapshots From dropdown list, select a desired profile period (e.g. "Hourly for 3 hours", "Midnight", "Noon"). The options that appear will depend on the periods defined in the Snapshot Profile assigned for the local system (by default, this will be the Cloud Snapshots profile.)
-
Remote Retention will default to the local retention of the selected period; change if a different retention setting is desired for the remote copy. (Changing the Remote Retention does not affect the local retention.)
- Priority (0-9) can be specified to arrange different periods into sequence by priority, with lower number taking precedence over a higher number; for example: a period set to priority 1 will sync before a different period set to priority 2.
- Do not expire snapshot option can be selected to ensure a snapshot will not expire locally before it syncs; this can be important for snapshots configured with a short retention period locally, but a longer retention on the remote system.
- Prefix the snapshot name with this on the destination can be used to assign added text to the beginning of the existing snapshot name. This is optional, but recommended, in order to avoid potential conflicts with other snapshots on the destination.
- Click Submit to add the selected period to the Auto Sync Configuration.
- Repeat the above steps to add all the desired Profile Periods to the Sync (any number of the available Profile Periods can be added.) For example, the default Cloud Snapshot Profile contains three periods (Hourly for 3 hours/Midnight/Noon); the Sync can be configured to include all these Profiles or only a subset. As an example: the Midnight and Noon Periods could be selected for the Sync, while the Hourly Snapshots not included and only kept locally.
Sync Scheduling#
When no schedule is defined for the sync, Snapshots defined in the Auto Sync Configuration are immediately synchronized as they are created (or put into the queue, when something else currently syncing). A specific Sync schedule can be defined to confine syncs to particular days/times (e.g. outside of business hours). Additionally, syncs can be configured to run with specific throttles during particular time frames, for example: a tighter throttle used during daytime hours, with a less-restrictive or no throttle during evening hours.
To Contain a Sync to a Specific Schedule#
- Navigate to the Outgoing Sync Dashboard (Main Dashboard -> Backup /DR -> Outgoing Syncs -> double-click on the sync in the listing).
-
Under Sync Schedule Configuration, click the Add Item link.
-
Create a Task with Task type = Enable to set a start time for the sync.
- Create an additional Task with Task type = Disable to set a stop time for the sync.
More information on creating Tasks is available here: Create Tasks
To Configure Throttle Scheduling#
- Navigate to the Outgoing Sync Dashboard (Main Dashboard -> Backup /DR -> Outgoing Syncs -> double-click on the sync in the listing).
-
Under Sync Schedule Configuration, click the Add Item link.
-
Create a Task with Task type = Throttle Sync, configure the schedule and select desired bandwidth limit in the Send throttle field.
- Create an additional Task with Task type = Disable Throttle Sync configuring a schedule for the throttle to be turned off. -OR- Create an additional Task with Task type = Throttle Sync configuring a schedule to implement an alternate bandwidth limit for throttle.
More information on creating Tasks is available here: Create Tasks
Repair Server#
A Repair Server will allow vSAN data blocks to be replicated from the sync destination back to the source when needed; this provides automatic restoration attempts in the event of hardware or power issues that surpass redundancy levels. See the Repair Server page for more information.
If you would like to request a KB based on a specific subject, please email our support team at support@verge.io.{.is-info}