Skip to content

Virtual Machines#

Settings that Influence VM Node Selection

Each time a VM is powered on or migrated, the system decides where to run the VM based on user-specified VM options as well as balancing workloads across available nodes.

VM options used in deciding node selection for running a VM:

  • HA Group

    • Node Affinity: (value starts with a "+", e.g. "+commapp") The system attempts to run VMs with the same HA Group value on the same node. This is used to coalesce application-related workloads to a single physical node for performance optimization.
    • Node Anti-affinity: (value does NOT with "+", e.g. "webservers") VMs with the same HA Group value are run on separate nodes to provide high availability of applications or services.
  • Preferred Node: a specific node is selected as the first-choice

  • Preferred Cluster: nodes in specified cluster used as first choice
  • Failover Cluster: nodes in specified cluster used as next choice when preferred cluster is not available

For more information about these and other VM options, see: Product Guide - Virtual Machine Fields

Device Passthrough Advanced Configuration (Manual Creation/Editing of Resource Rules)

Although allowing auto-generation of resource rules (e.g. when you select a device and use the Make Passthrough menu option) is easiest and usually recommended, there may be situations where it may be useful to manually create a resource rule or to modify an auto-generated resource rule.

It is important to read and be familiar with PCI Passthrough Risks and Precautions before making passthrough configurations.

Manually Create a New Resource Rule

  1. From the main dashboard, click Resources.
  2. Click Rules (ui card or on the left menu).
  3. Click New on the left menu.
  4. Provide a Name for the Rule; it is recommended to use a descriptive name can be helpful in future administration.
  5. Select the Resource Group to which the resource rule will apply.
  6. Select a specific Node or select --None-- to apply the rule to all nodes.
  7. Select the Type (PCI, USB, SR-IOV, or NVIDIA vGPU).
  8. Leave the default value set to --None-- in the field labeled Automatically created based on PCI Device.
  9. Configure device filters as desired; filter fields will vary depending on the device type selected; see below. (Advanced Entry 1 option also available)

Information on installed PCI devices, for use in filters, you can use the PCI devices listing: from the Main Dashboard, navigate to the Resources -> PCI Devices. To show additional fields, right-click in the heading section to select from the full list of available columns that can be displayed.

Edit an Existing Resource Rule

  1. Navigate to the Associated Resource Group dashboard (Main Dashboard > Resources > Groups > double-click the particular group).
  2. In the Rules section, locate and click the desired resource rule.
  3. Click Edit on the left menu.
  4. Node selection and PCI Filters can be modified as needed. (Advanced Entry 1 option also available)

  1. The Advanced Entry section allows you to manually input filter syntax rather than using the filter entry fields. Generally, it is preferable to allow system-generated syntax based on your filter field selections. 

API Helper Script

The yb-api helper script provides an easy way for developers to interact with the VergeOS API. It simplifies making API calls, such as retrieving virtual machines, updating configurations, and managing resources. This guide will outline the key commands and usage of the yb-api script.

Prerequisites

  • Access to a VergeOS system.
  • Access to the cluster via SSH or direct connection.
  • wget and curl must be installed on the system for certain operations.

Running the Helper Script

To get help or view the available options, run:

yb-api --help

Connect to the node and execute this command to begin using the API helper.
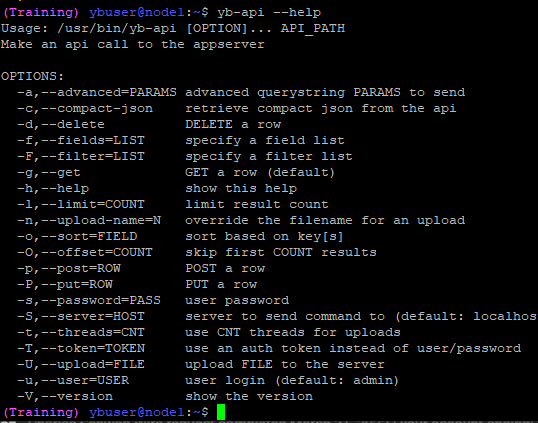
yb-api Example

Example Commands

Below are examples of how to use yb-api for various VM management tasks.

Get a List of Virtual Machines (excluding snapshots)

Retrieve a list of VMs and filter out snapshots.

yb-api --get --user=admin --server=10.0.0.100 \
--fields='name,$key,ram,machine#status#status as machine_status' \
--filter='is_snapshot eq false' /v4/vms

Simple Dump of All VMs

This command retrieves a list of all VMs. The --server, --user, --filter, and --fields flags are optional in this case.

yb-api --get /v4/vms

Get Detailed VM Information

Retrieve most of the fields, including drive and NIC information, for a specific VM (VM 1 in this case).

yb-api --get --user=admin --server=10.0.0.100 \
--fields='most,machine[most,drives[most],nics[most]]' /v4/vms/1

Rename a Virtual Machine

Change the name of an existing virtual machine (VM 1) to "NEWNAME".

yb-api --put='{"name":"NEWNAME"}' --user=admin --server=10.0.0.100 /v4/vms/1

Delete a Virtual Machine

Delete a specific VM (VM 1), using its $key.

yb-api --delete --user=admin --server=10.0.0.100 \
--fields='name,$key,ram' /v4/vms/1

Create a New Virtual Machine

Create a new VM with specific configurations (name, CPU cores, RAM, etc.).

yb-api --post='{"name":"NEWVM","enabled":true,"description":"test vm",\
"os_family":"linux","cpu_cores":4,"ram":"8192"}' --user=admin \
--server=10.0.0.100 /v4/vms

Get the VM Database Table Schema

Retrieve the schema for the VMs database table.

yb-api --get --user=admin --server=10.0.0.100 '/v4/vms/$table'

Clone a Virtual Machine

Clone an existing VM (VM 1) and give it a new name.

yb-api --get --user=admin --server=10.0.0.100 '/v4/vm_actions' \
--post='{"vm":1, "action": "clone", "params": {"name": "NEW VM NAME"}}'

Power On a Virtual Machine

Power on an existing VM (VM 1).

yb-api --get --user=admin --server=10.0.0.100 '/v4/vm_actions' \
--post='{"vm":1, "action": "poweron"}'

Notes About yb-api

  • The yb-api script relies on wget, which may not be installed by default on macOS. Make sure to install it if necessary.
  • curl is used for the upload function in certain API calls, such as posting data to create new VMs.

By using the yb-api helper script, developers can simplify interaction with the VergeOS API and manage virtual machines more efficiently. Let us know if you need assistance with further commands or options.


Document Information

  • Last Updated: 2024-08-29
  • vergeOS Version: 4.12.6