Replacing a Defective or End-of-life Drive#
This page covers replacing a drive (participating in the vSAN) due to defect or end of lifespan. Expedient replacement of problem drives is crucial to maintaining vSAN data protection.
When Does a Drive Need to be Replaced?#
The VergeOS interface will provide warnings or alerts to indicate when there is a problem with a physical drive. When a drive has a warning or error status, an indicator will "bubble up" to the System Dashboard page (Navigate to System > Dashboard from the top menu.)
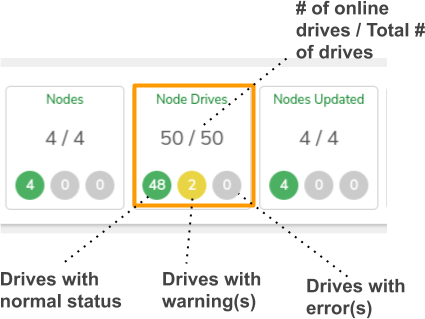
- Click anywhere within the drive count box to access the full list of drives.
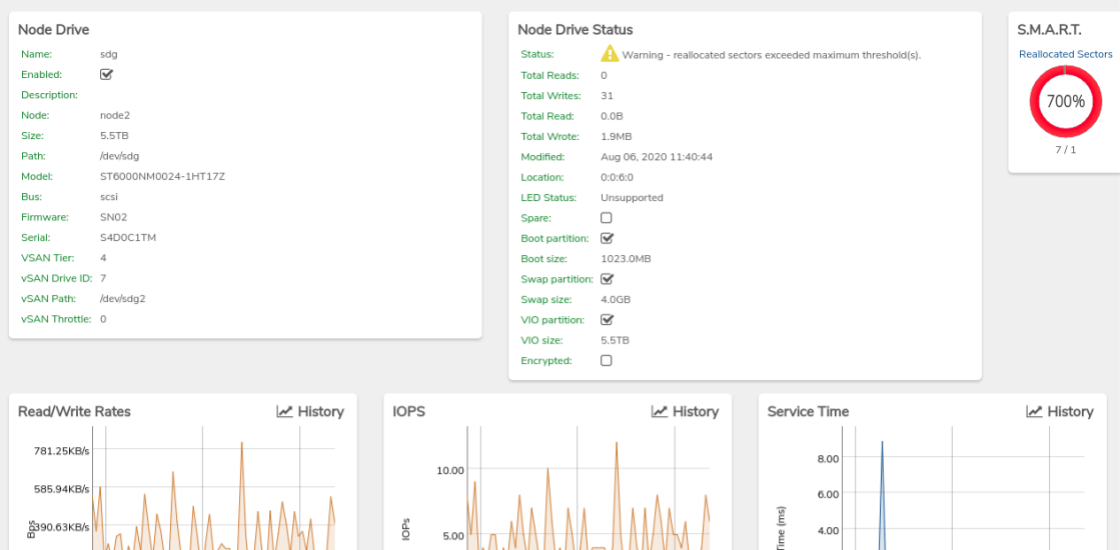
- Double-click a drive with an error/warning to view its dashboard that displays more detail.

Example Warning/Error Statuses#
- Warning - Wear level exceeded maximum threshold(s)
- Warning - Reallocated sectors exceeded maximum threshold(s)
- Error - Drive is unresponsive; read or write error threshold reached
- Missing - Drive is no longer detected by the system (failed or physically removed)
Important
It is highly recommended to configure on-demand and scheduled subscriptions (with target type=system Dashboard) to ensure timely awareness of drive issues. The Creating Subscriptions Guide provides information about setting up subscriptions.
Which Replacement Procedure Should I Use?#
The replacement procedure depends on the current state of the drive:
| Drive Status | Condition | Procedure |
|---|---|---|
| Missing or Error (unresponsive) | Drive has already failed and is not responding | Scenario 1: Replace a Failed/Missing Drive |
| Warning or Degraded | Drive is still operational but showing signs of failure | Scenario 2: Proactively Replace a Working Drive |
How to Tell if a Drive is Missing
A missing drive will show a status of Missing in the drive list. This occurs when the drive has completely failed, lost connection, or has already been physically removed. The drive entry remains in the UI to allow you to initiate the replacement process.
Determine Correct Physical Drive for Replacement#
- Navigate to the node dashboard.
-
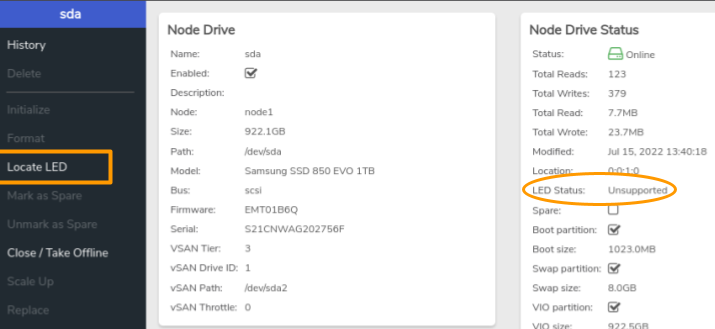
Activate the drive LED
- If LED Status indicates Off, click Turn on LED on the left menu.
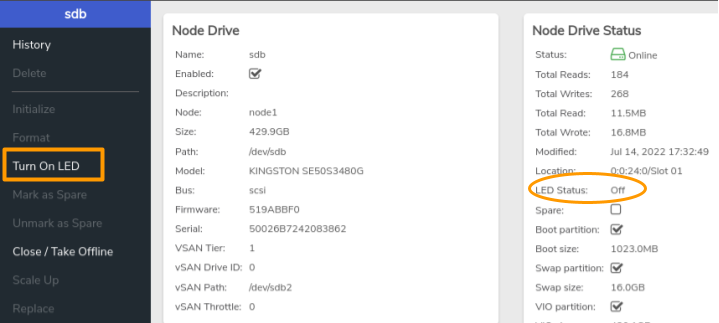
- If LED Status field indicates Unsupported, click Locate LED on the left menu.
-
The Diagnostics window will appear with settings pre-filled. Click Send -> to activate the drive LED.
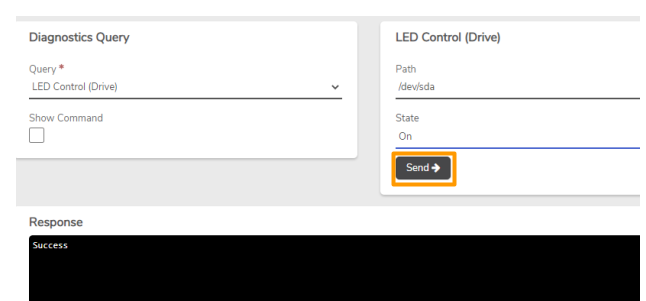
-
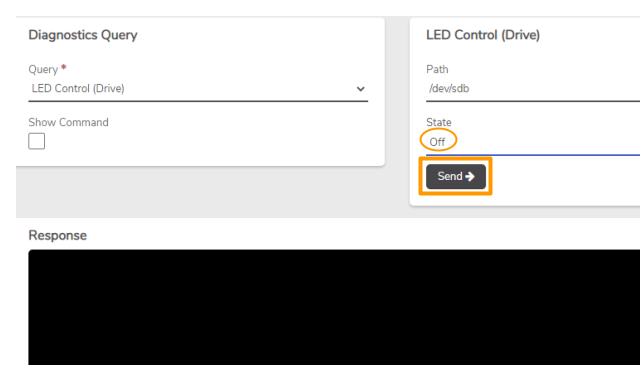
Once the LED is activated, the physical drive can be located by identifying the one with a solid light. After identifying the drive, deactivate the LED:
Scenario 1: Replace a Failed/Missing Drive#
Use this procedure when a drive has already failed and is no longer responding, or when the drive shows a Missing status in the UI.
CAUTION: Before initiating a drive repair operation, verify:
- The node that contains the failed drive will need to be placed into maintenance mode. All other nodes should be online and fully operational (i.e. not in maintenance mode or offline).
- No other drive repairs are running on different nodes within the same storage tier (Drive repairs on the same physical node are acceptable)
- Place the node that has the failed drive into Maintenance Mode.
- If the failed drive is still physically present, remove it from the node. Use the LED activation process if needed to identify the correct drive.
- Insert the replacement drive into the same slot (or any available slot).
- Wait for the new drive to be detected by the system.
- From the node dashboard, click Drives.
- Click to select the failed/missing drive entry in the list (the old drive that needs replacement).
- Click Replace Drive on the left menu.
- In the dialog that appears, select the new drive from the list of available drives.
- Click Submit to confirm the replacement.
Success
The system will automatically format and initialize the new drive, then begin the repair process. The drive status will change to "Repairing" and the dashboard will show an Estimated Repair Completion date and time.
Scenario 2: Proactively Replace a Working Drive#
Use this procedure when a drive is still operational but showing warning signs (such as wear level warnings or reallocated sectors) and you want to replace it before it fails completely.
CAUTION: Before initiating a drive repair operation, verify:
- The node that the drive to be replaced resides on will need to be placed into maintenance mode. All other nodes should be online and fully operational (i.e. not in maintenance mode or offline).
- No other drive repairs are running on different nodes within the same storage tier (Drive repairs on the same physical node are acceptable)
- You have positively identified the correct physical drive using the LED activation process above
- Place the node that has the faulty drive into Maintenance Mode.
- From the node dashboard, click Drives.
- Click to select the particular drive (Selected drive shows a check mark on the left.)
- Click Close/Take Offline on the left menu. In the resulting modal pop-up that appears, click the checkbox for "I understand the risks" regarding the warning that the node should be in maintenance mode.
- When the drive status appears as Offline: physically remove the drive, being extremely careful to remove the correct drive.
- Verify the UI reflects the drive is missing to verify that the proper drive was removed.
- Insert the replacement drive.
- Wait for the drive to be detected; the dashboard will show the new drive as Offline.
- Click Format on the left menu. In the resulting modal pop-up that appears, click the checkbox for "I understand the risks" regarding the warning that the node should be in maintenance mode.
- Wait until the dashboard no longer indicates the disk is formatting.
- Click Initialize on the left menu. In the resulting modal pop-up that appears, click the checkbox for "I understand the risks" regarding the warning that the node should be in maintenance mode.
Success
After the vSAN has completed a full walk, the repair process will begin, and the drive status will change to "Repairing"; at this point the drive dashboard will indicate an Estimated Repair Completion date and time.
During the Repair Process#
Important
The following applies to both replacement scenarios:
- Do NOT restart, reset or power off any nodes until the drive shows a status of "Online"; it is important that all other nodes remain fully operational during the repair process.
- Additional drive replace/repair operations should NOT be initiated until this repair operation has fully completed unless the additional drive resides: within the same node - OR - on another storage tier.
Troubleshooting#
If the Replace Drive option is not working or the replacement process fails:
- Reboot the node - This can help the system properly detect the new drive and clear any stale state.
- Verify drive compatibility - Ensure the replacement drive meets the same specifications as the original (capacity, interface type).
- Check drive seating - Ensure the new drive is properly seated in the slot.
- Contact support - If issues persist after a node reboot, contact VergeOS support for assistance.