> For the complete documentation index, see [llms.txt](https://docs.verge.io/llms.txt). Markdown versions of documentation pages are available by appending `.md` to page URLs; this page is available as [Markdown](https://docs.verge.io/run-the-platform/system-administration/nvidia-vgpu-configuration.md).
# NVIDIA vGPU Configuration
Step-by-step guide to configuring NVIDIA vGPU in VergeOS, including traditional vGPU profiles, MIG partitioning, heterogeneous profiles, resource group setup, and tenant sharing.
VergeOS allows seamless utilization of NVIDIA's vGPU platform to assign virtualized GPU devices among tenants and VMs.
{% hint style="info" %}
**New in 26.1.3**
VergeOS now includes expanded NVIDIA feature support, providing increased flexibility for dividing GPU devices across workloads
* **Heterogeneous vGPU profiles** - use multiple traditional vGPU profiles within the same device. Requires NVIDIA driver version 17.2 or later and device support.
* **MIG profiles** - a single GPU can be partitioned into up to seven hardware-isolated instances, for guaranteed service to multiple simultaneous workloads. Requires device support; latest NVIDIA data-center driver recommended.
{% endhint %}
{% hint style="success" %}
**NVIDIA vGPU functionality requires NVIDIA's commercial vGPU licensing. This applies to both traditional vGPU and MIG‑backed vGPU configurations.**
{% endhint %}
***
## Overall workflow
These are the high-level steps required for VergeOS NVIDIA vGPU configuration:
* **Upload Driver** Upload the bundled NVIDIA driver to the VergeOS environment.
* **Create a Resource Group** Generate a resource group based on selected physical GPU device(s), selecting a MIG or traditional vGPU profile. This creates a pool of assignable vGPU devices. Multiple resource groups can be created per physical device to provide a mix of different vGPU types for different use cases.
* **Load Drivers** Each node should be placed into maintenance mode to load the NVIDIA driver. (Node reboot may be necessary if IOMMU has not been enabled yet and/or first-time driver load.)
* **Add Devices to Individual VMs** Add a device to a VM, selecting the created resource group. This allows the VM to pull from the pool of available virtual GPU devices within the resource group.
* **Share to Tenants** Share devices to individual tenants, allowing them to add the vGPU devices to their own VMs.
***
The following sections provide step-by-step instructions to enable and assign NVIDIA vGPU resources within VergeOS.
## Prerequisites
Before starting, ensure the following are in place:
* **NVIDIA vGPU-capable GPU** installed in one or more VergeOS nodes (see [NVIDIA Supported GPUs](https://docs.nvidia.com/vgpu/gpus-supported-by-vgpu.html) )
* **IOMMU / VT-d / SR-IOV enabled** in the host BIOS — if not yet enabled, plan for a node reboot during this process (follow proper [**Maintenance Mode**](/run-the-platform/operations/maintenance-mode.md) procedures).
* **NVIDIA vGPU software license** — access to the [NVIDIA licensing portal](https://nvidia.com/en-us/data-center/resources/vgpu-evaluation) to obtain drivers
* **VergeOS admin access** to the Resource Manager and node configuration
* Familiarity with [**PCI Passthrough Risks and Precautions**](/run-the-platform/system-administration/device-pass-overview.md#pci-passthrough-risksprecautions)
## Host Installation/Configuration
1. Obtain the appropriate NVIDIA Linux-KVM driver for your GPU hardware. NVIDIA vGPU drivers can be downloaded from your NVIDIA licensing portal or by registering for an NVIDIA free evaluation: [**https://nvidia.com/en-us/data-center/resources/vgpu-evaluation**](https://nvidia.com/en-us/data-center/resources/vgpu-evaluation).
VergeOS supports bundle-version NVIDIA drivers. For a list of currently supported NVIDIA drivers, navigate to Resource Manager > Groups > New. Set Type=NVIDIA vGPU and click the button to view compatible third-party drivers. Typically, you will want to use the most recent driver in this list that is compatible with your NVIDIA hardware.
The following instructions configure selected vGPU device(s) for virtual function passthrough by automatically creating necessary resource rules for each selected device and attaching the device(s) to a resource group. This creates a pool of virtual function devices that can be assigned to tenants and virtual machines to draw from. For more information about resource groups and resource rules, see: Device Passthrough - Overview
```
```
**If the profile list is empty, skip this field for now and click **Submit** to save the resource group. Follow instructions below to [Reload Drivers](#reload-drivers) on at least one node, then return to the resource group (**Infrastructure** > **Resources** > **Groups** > double-click the group > **Edit**) to select the profile.**
```
* The **Driver** dropdown list will contain all NVIDIA vGPU drivers (.zip) found in the *Files* section. The appropriate driver will need to be uploaded to the vSAN before it can be selected (Steps 1-2 above). Select the appropriate driver.
* Click **Submit** to save the resource group. After the resource group is selected or a new one is created, a **Success** message should appear indicating resource rules were created for the device(s).
* If a driver has not been previously loaded or IOMMU is not yet enabled, **reboot the associated node(s)** in [**Maintenance Mode**](/run-the-platform/operations/maintenance-mode.md) before continuing.
* After the node(s) are rebooted, navigate to the NVIDIA vGPU resource group just created (Infrastructure > Resources > Groups > double-click the group).
* Click **Edit** on the left menu.
* Select **NVIDIA vGPU Profile**: Traditional or MIG (Tabs below provide associated instructions):
{% tabs %}
{% tab title="Traditional vGPU Configuration" %}
* **NVIDIA vGPU Profile**: select the desired traditional profile.
* **Total vGPU Instances**: number of virtual instances to create with the given profile.
* **Scheduler Policy**, **Frequency**, **Averaging Factor**, **Time Slice Length (ms)**, **Strict Round Robin**: NVIDIA-specific settings — consult NVIDIA documentation for specific performance tuning.
* **Driver**: pre-populated from previous step.
{% hint style="info" %}
**Flexible Profile Configuration**
Starting in version 26.1.3, VergeOS supports heterogeneous vGPU profiles. This enables greater flexibility, allowing a physical device to host a mix of different profile types and sizes simultaneously (requires NVIDIA driver version 17.2 or later and device support).
* NVIDIA only allows mixing vGPU profiles that share the same architecture and belong to the same compatibility group - consult NVIDIA documentation for more information.
* Combined profiles must fit within the GPU's total framebuffer (available VRAM).
* MIG and traditional profiles **cannot** be mixed on the same physical device.
* NVIDIA SMI queries can provide information about vGPU profiles compatible with those that have already been configured for a device. See [Troubleshooting Tips](#troubleshooting-tips) for more information.
{% endhint %}
{% hint style="info" %}
**Example: Using Heterogeneous Profiles**
* **Physical device**: The NVIDIA L40S provides **48 GB of framebuffer memory**
* **Multiple profile types** are implemented for the device:
* **L40S-24C:** One compute‑optimized vGPU instance using 24 GB
* **L40S-12Q:** One graphics‑optimized vGPU instance using 12 GB
* **L40S-4C:** Three lightweight compute vGPU instances using 4 GB each (12GB total)
* A separate resource group (device pool) is created for each profile type.
* Together, these heterogeneous profiles allocate the entire framebuffer while **supporting multiple workload types** (compute, graphics, inference workloads) on the same physical GPU.
* **Remaining capacity**: This configuration uses the **entire 48 GB framebuffer**, leaving **no remaining capacity** for additional vGPU profiles.
{% endhint %}
{% endtab %}
{% tab title="MIG vGPU Configuration" %}
* **NVIDIA vGPU Profile**: select the desired MIG profile.
{% hint style="info" %}
**Multiple profiles used for a single device**
* Combined profiles must fit within the GPU's total framebuffer (available VRAM).
* MIG and traditional profiles cannot be mixed on the same physical device.
{% endhint %}
* **MIG GPU Instances**: (maximum is listed in the description) number of MIG instances to create.
* **Total vGPU Instances**: default=0 (maximum) - this setting determines the number of assignable virtual GPU instances per MIG partition.
* Leave this value at 0 to automatically create the maximum number of virtual GPUs for the selected MIG profile.
* Set the value to 1 to create one single virtual GPU using the entire MIG slice.
* Setting a value other than 0 or 1 will result in unused capacity inside the MIG slice.
* **Driver**: pre-populated from previous step.
{% hint style="info" %}
**Example: MIG instance further divided into virtual instances**
* **Physical device**: The RTX Pro 6000 Blackwell DC provides 96 GB of framebuffer memory
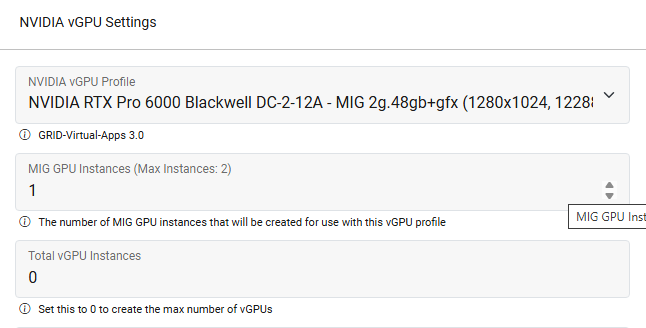 * **MIG profile added**: Selecting the profile *NVIDIA RTX Pro 6000 Blackwell DC‑2‑12Q‑MIG (2g.48gb+gfx)* and specifying *MIG GPU Instances*:1 creates one MIG slice with 48 GB of dedicated framebuffer. This MIG slice supports **four vGPU instances**, each using **12 GB** (the “12Q” profile)
* **Remaining capacity**: After allocating this 48 GB MIG slice, **48 GB of framebuffer** remains available for additional MIG profiles
* One or more additional resource groups can be created to utilize the remaining capacity with different MIG profile types.
{% endhint %}
{% endtab %}
{% endtabs %}
### Guest Driver ISO
The following guest driver settings apply to both Traditional and MIG vGPU configurations.
* **Driver ISO**: Use the **Make Guest Driver ISO** option to automatically create a guest driver installer for your VMs. If you have already created guest drivers, select the ISO in the next step.
* The **Driver ISO** file specifies an ISO file that can be attached to consuming VMs, providing a convenient way to access client drivers for installation within the guest operating system. (Select the ***Attach Guest Drivers*** option when attaching the device to a VM or tenant.)
{% hint style="info" %}
**If you selected the *****Make Guest Driver ISO***** option, leave the Driver ISO field set to *****-- None --*****; the system will automatically create the ISO file (based on the bundle driver selected) for installing client drivers to VMs.**
{% endhint %}
***
## Reload Drivers
* When resource group configuration is complete and has been submitted, place the node into [**Maintenance Mode**](/run-the-platform/operations/maintenance-mode.md) and click **Reload Drivers**.
* Monitor the Node Dashboard logs (bottom of page) to **verify the driver is successfully installed** before disabling maintenance mode.
{% hint style="success" %}
The resource group dashboard contains the resource rules that were auto-generated based on your selected NVIDIA devices. You can click an individual rule to view configuration detail. A system-created rule can be modified as needed. For example, the *Node* filter can be changed to *-- None --* to include matching devices from all nodes; the *slot* filter can be removed or modified to accommodate devices that may reside on different slots within the same node or across different nodes. Information regarding resource rules is available at: [**Device Passthrough Overview - Resource Rules**](/run-the-platform/system-administration/device-pass-overview.md#resource-rules)
{% endhint %}
## VM/Guest Configuration
1. Navigate to the VM dashboard (from the top menu: Virtual Machines > List > double-click desired VM in the listing)
2. Click **Devices** on the left menu.
3. Click **New** on the left menu.
* **MIG profile added**: Selecting the profile *NVIDIA RTX Pro 6000 Blackwell DC‑2‑12Q‑MIG (2g.48gb+gfx)* and specifying *MIG GPU Instances*:1 creates one MIG slice with 48 GB of dedicated framebuffer. This MIG slice supports **four vGPU instances**, each using **12 GB** (the “12Q” profile)
* **Remaining capacity**: After allocating this 48 GB MIG slice, **48 GB of framebuffer** remains available for additional MIG profiles
* One or more additional resource groups can be created to utilize the remaining capacity with different MIG profile types.
{% endhint %}
{% endtab %}
{% endtabs %}
### Guest Driver ISO
The following guest driver settings apply to both Traditional and MIG vGPU configurations.
* **Driver ISO**: Use the **Make Guest Driver ISO** option to automatically create a guest driver installer for your VMs. If you have already created guest drivers, select the ISO in the next step.
* The **Driver ISO** file specifies an ISO file that can be attached to consuming VMs, providing a convenient way to access client drivers for installation within the guest operating system. (Select the ***Attach Guest Drivers*** option when attaching the device to a VM or tenant.)
{% hint style="info" %}
**If you selected the *****Make Guest Driver ISO***** option, leave the Driver ISO field set to *****-- None --*****; the system will automatically create the ISO file (based on the bundle driver selected) for installing client drivers to VMs.**
{% endhint %}
***
## Reload Drivers
* When resource group configuration is complete and has been submitted, place the node into [**Maintenance Mode**](/run-the-platform/operations/maintenance-mode.md) and click **Reload Drivers**.
* Monitor the Node Dashboard logs (bottom of page) to **verify the driver is successfully installed** before disabling maintenance mode.
{% hint style="success" %}
The resource group dashboard contains the resource rules that were auto-generated based on your selected NVIDIA devices. You can click an individual rule to view configuration detail. A system-created rule can be modified as needed. For example, the *Node* filter can be changed to *-- None --* to include matching devices from all nodes; the *slot* filter can be removed or modified to accommodate devices that may reside on different slots within the same node or across different nodes. Information regarding resource rules is available at: [**Device Passthrough Overview - Resource Rules**](/run-the-platform/system-administration/device-pass-overview.md#resource-rules)
{% endhint %}
## VM/Guest Configuration
1. Navigate to the VM dashboard (from the top menu: Virtual Machines > List > double-click desired VM in the listing)
2. Click **Devices** on the left menu.
3. Click **New** on the left menu.
You can also attach devices to a VM via Resource Manager; this method allows for adding multiple devices to the VM at once. From Resource Group dashboard > double-click the desired vGPU Group > View Machine Devices > New; select the VM from the Machine dropdown list.
NVIDIA client licensing may involve generating a client config token on the NVIDIA licensing server that will need to be downloaded into the VM guest, followed by a VM reboot.