Wireguard - Setup Remote Access VPN
How to Setup a Wireguard Remote Access VPN#
Here are instructions on how to set up a Remote Access VPN using the built-in Wireguard capabilities of VergeOS. More information can be found in the Help section of the VergeOS User Interface.
Create the Wireguard Setup on Your Internal Network#
You can use an existing Internal Network or create a new Internal Network.
- In the Verge OS UI, navigate to Networks -> Internals and view or double-click on the Internal Network that you want to use.
- In the left menu, click on Wireguard (VPN).
-
Click on Add New Interface.
-
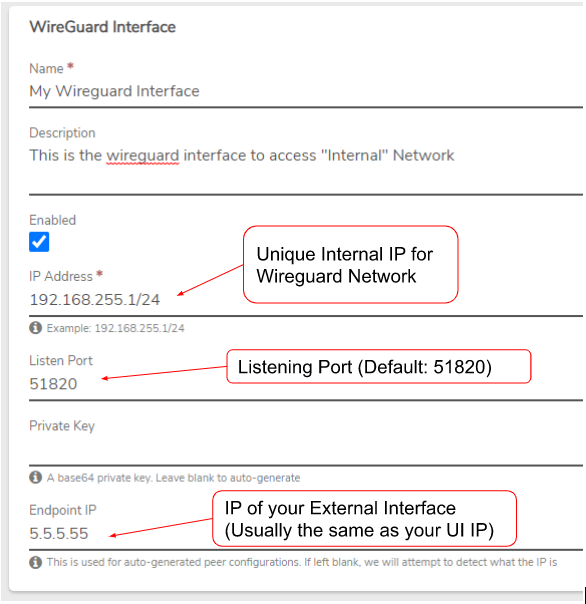
Enter the following information:
- Enter a unique Name for this interface.
- Enter a Description (optional).
- Check Enabled.
- Enter the IP Address to be used for this Wireguard Internal Network. This must be separate from your existing Internal network IP scheme. For example, if your Internal Network is using 192.168.0.1/24, you must choose a different unique IP scheme like 192.168.255.1/24.
- Enter the Listen Port to be used when connecting to the VPN (Default: 51820). This is the port that you will use on your External network to send VPN traffic into your Internal Network.
- Enter a Private Key or leave it blank to auto-generate a key.
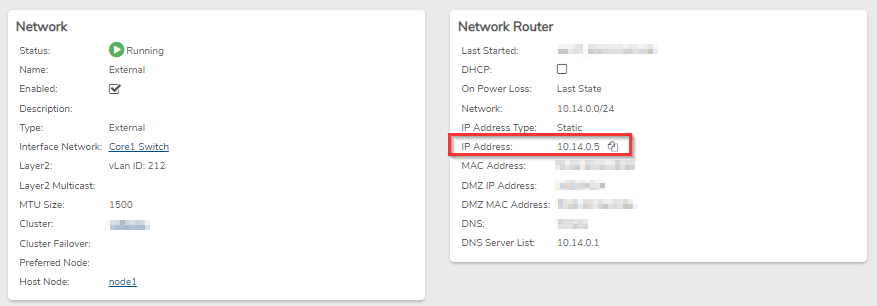
- Enter an Endpoint IP or leave it blank, and the system will attempt to auto-detect the IP. We highly recommend you enter the IP manually to ensure the correct config. This IP is the external IP of your environment, usually the same IP as your UI. You can find your External IP by going to Networks -> Externals and viewing your External network. In the Network Router section, it should be the IP address as shown below:
-
Click Submit to add the new interface.
-
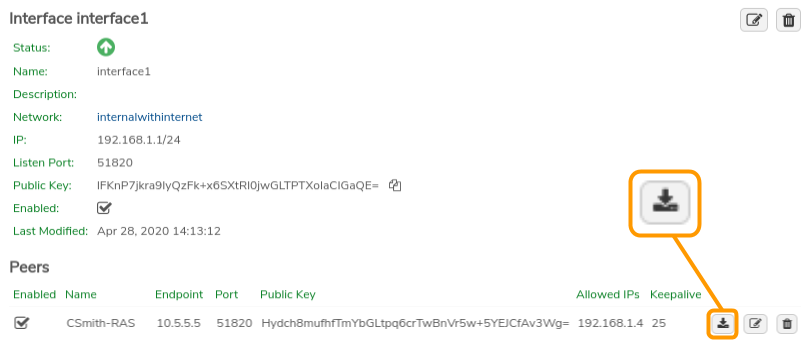
After adding the interface, it will take you to the dashboard where you will see your new interface.
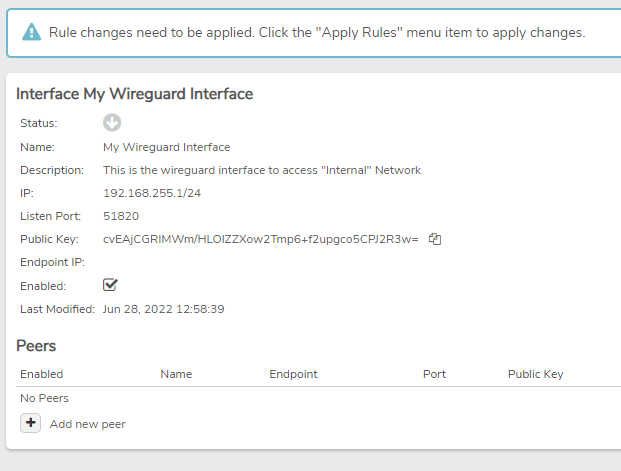
-
Click Apply Rules on the left menu bar to apply the firewall rules. The rules automatically created will accept inbound UDP traffic on port 51820 to both the Router IP and the DMZ IP of the Internal Network.

External Network PAT Rule#
In order for the internal network to be connected, we need an external PAT (Port Address Translation) rule to translate the port (default 51820) to the internal network.

Add External PAT Rule#
- From the External network Dashboard, click Rules on the left menu.
- Click New on the left menu.
- Enter a Name that will be helpful to future administration.
- Optionally, a Description can be entered to record additional administrative information.
- In the Action dropdown, select Translate.
- In the Protocol dropdown, select UDP.
- In the Direction dropdown, select Incoming.
Source:
- In the Type dropdown, select Any/None. Optionally, you can source-lock the VPN traffic here if needed.
Destination:
-
In the Type dropdown, select My Router IP. If you are inside a Tenant, change this to My IP Addresses and choose the IP of the Tenant UI. This should be the same as the Endpoint IP used above. If using a different IP than the UI IP, create an SNAT rule on the External network.
-
In the Destination Ports/Ranges field, enter the Port (Default Port: 51820).
Target:
- In the Type dropdown, select Other Network DMZ IP.
- In the Target Network dropdown, select the Target Network.
-
Leave the Target Ports/Ranges field blank.
-
Click Submit and Apply Rules on the left menu to put the new rule into effect.
SNAT Rule (if not using UI IP)#
If you are adding Wireguard and are not using the IP address of the UI, we recommend creating an SNAT rule on the External network.
- From the External network Dashboard, click Rules on the left menu.
- Click New on the left menu.
- Enter a Name that will be helpful to future administration.
- Optionally, enter a Description for additional information.
- In the Action dropdown, select Translate.
- In the Protocol dropdown, select UDP.
- In the Direction dropdown, select Outgoing.
Source:
- In the Type dropdown, select Other Network DMZ IP.
- In the Network dropdown, select the Internal Network that Wireguard is on.
- Leave the Source Ports/Ranges field blank.
Destination:
- In the Type dropdown, select Any / None.
- Leave the Destination Ports/Ranges field blank.
Target:
- In the Type dropdown, select My IP Addresses.
-
In the IP Address dropdown, select the IP address you want to use.
-
Click Submit and Apply Rules to enable the SNAT rule.
This SNAT rule forces any outgoing traffic from the DMZ IP of the internal network to use the correct IP. By default, it goes out the UI IP, causing flapping issues.
Adding a Remote User Peer#
You will set up a Peer for each user connecting to the VPN.
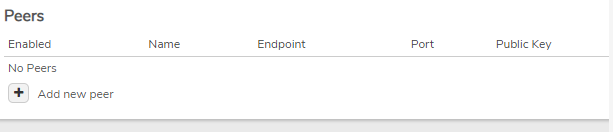
-
From the Wireguard Interface screen, click Add new peer.
-
Assign a Name to the peer, such as the remote user's name.
- Optionally, enter a Description.
- Check the Auto-Generate Peer Configuration checkbox.
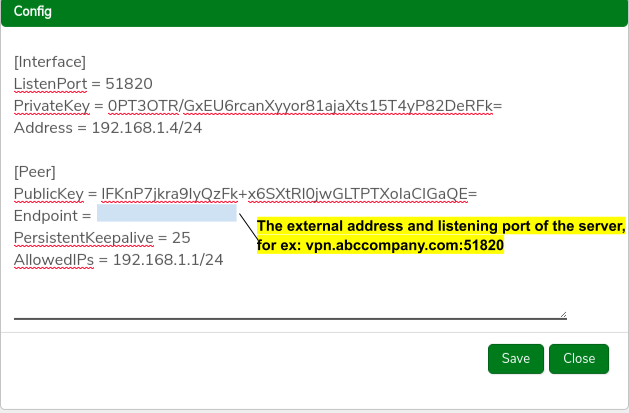
- Enter the Endpoint for the Peer (the external-facing IP address, hostname, or URL).
- For Allowed IPs, enter the /32 IP for this peer.
- In the Configure Firewall dropdown, select Remote User.
- Click Submit to save the peer entry.

Download the Configuration File:#
- Click the Download Config button on the peer record and download the file.
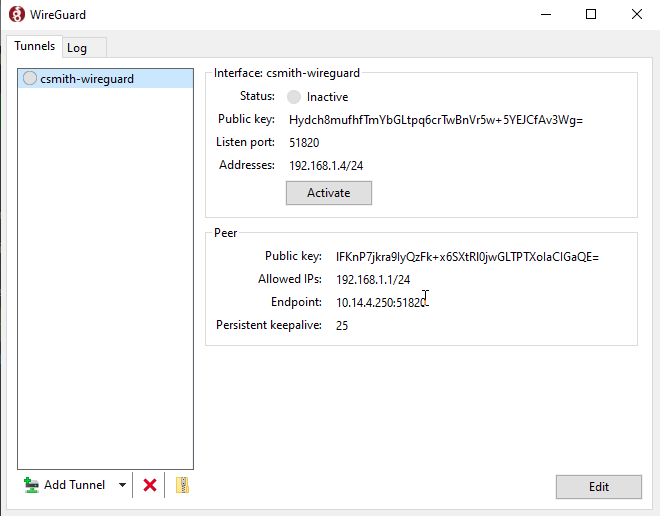
Install WireGuard Software on Client:#
WireGuard client software can be downloaded from: https://wireguard.com/install.
- Install WireGuard on the client machine.
- Click Add Tunnel.
- Navigate to and select the generated configuration file.
- Click the Activate button to open the tunnel.
Document Information
- Last Updated: 2024-08-29
- vergeOS Version: 4.11