Virtual Wire Host Placement
When using a virtual wire, both networks participating in that virtual wire must be on the same host. Failure to meet this requirement can lead to network connectivity issues.
Virtual Wire Setup and Use#
A virtual wire provides a tenant the ability to access a VLAN outside the VergeOS environment without going through routing steps.
Prerequisite Steps#
- Add the desired VLAN(s) to the appropriate switch ports so they are accessible to the nodes running the VergeOS environment.
- Determine whether the tenant will need access to a single VLAN or multiple VLANs. This will determine the virtual wire configuration.
Warning
VLANs 1 & 100-102 cannot be used in a virtual wire capacity. These VLANs are reserved for internal traffic. They can, however, be remapped to another VLAN for tenant consumption.
Info
If a tenant requires access to more than 1 or 2 VLANs, it is recommended to configure the virtual wire in Trunk Mode.
Creating a 1:1 Virtual Wire#
- Ensure the VLAN(s) have been created in the VergeOS UI. If not, follow the steps to create VLAN(s) here.
- From the Main Dashboard, select Networks in the left menu to open the Networks Dashboard.
- Select Virtual Wires in the left menu to view all virtual wires in the environment.
- Select New to create a new virtual wire.
- Enter the following settings:
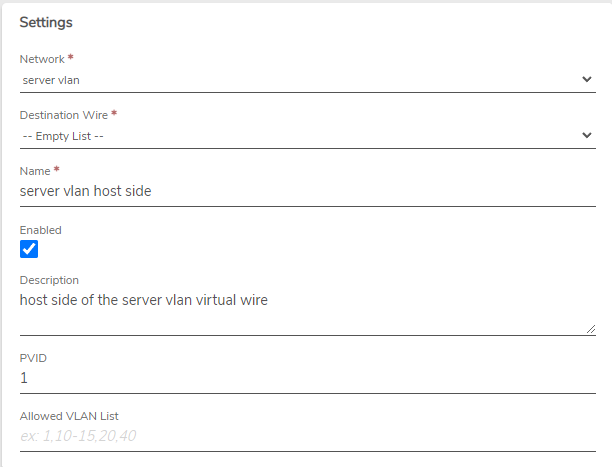
Info
- The Network dropdown will list all networks inside the environment. Choose the network with the corresponding VLAN to pass into the tenant.
- The Destination Wire dropdown will automatically select Empty List if no unconnected virtual wires are detected.
- Leave the PVID field set to 1.
- Submit your changes and return to the virtual wires list view.
- Select New to create the second half of the virtual wire.
- Enter the following settings:
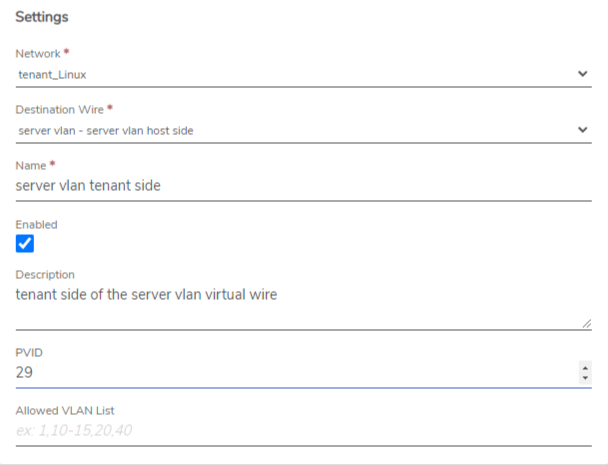
Info
- In the Network dropdown, select the tenant network that the VLAN will be passed to, typically named
tenant_'$TENANTNAME'. - The Destination Wire dropdown will automatically select the other half of the virtual wire created earlier.
- Change the PVID field to the actual VLAN ID of the network being attached.
- Submit your changes.
- Navigate to the Networks Dashboard, select Networks, and apply the rules for the networks connected by the virtual wires.
Creating a Trunk Mode Virtual Wire#
Warning
To use Trunk Mode Virtual Wires, the corresponding "Physical Network" (tied to node NICs) must be set to bridge mode.
Warning
If the external network is in a VLAN and the physical NIC that the external network references is in bridge mode, trunking a virtual wire from the bridge will not work.
Setting a Physical Network to Bridge Mode#
- Navigate to Networks in the left menu to access the Networks Dashboard.
- Select Networks again to view all networks in the environment.
- Double-click the Physical Network (NIC) that the VLANs are trunked to on the physical switch. !!! info A "Physical Network" typically has "Switch" appended and represents a physical NIC on a node.
- Select Edit to enter the network configuration page.
- In the configuration page, enable Physical Bridged to activate Bridge Mode.
The "On Power Loss" setting can remain as Last State or Power On.
- Submit your changes.
- Reboot the necessary nodes for Bridge Mode to become active.
Configuring a Trunk Mode Virtual Wire#
- Ensure the "Physical Network" is set to Bridged Mode and is powered on.
- From the Main Dashboard, select Networks and then Virtual Wires.
- Select New to create the first half of the virtual wire.
- Enter the following settings:
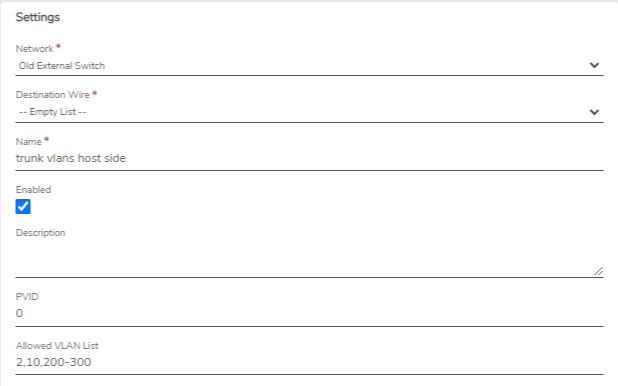
Info
- Select the corresponding Physical Network in the Network dropdown.
- Set the PVID field to 0.
- Enter the allowed VLANs in the Allowed VLAN List, comma-delimited and with ranges as necessary.
- Submit your configuration.
- Select New to create the second half of the virtual wire.
- Enter the following settings:
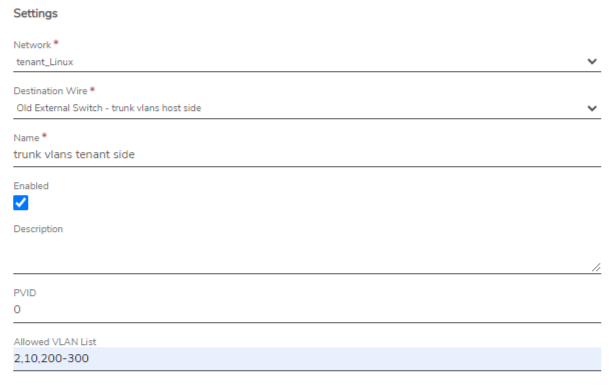
Info
- Select the tenant network in the Network dropdown.
- Set the PVID field to 0.
- Enter the allowed VLANs in the Allowed VLAN List.
- Submit your changes.
- Apply the rules for the connected networks as described above.
Adding VLANs Inside the Tenant#
- Navigate to the tenant UI and log in.
- From the Main Dashboard, navigate to Networks, then select New External.
- Enter the following settings:

For the interface network, select Physical.
- Submit your configuration.
- Attach workloads to the network for Layer 2 access to networks outside of Verge.io.
Troubleshooting Steps#
Traffic is not reaching the virtual machine#
- Confirm firewall rules related to the virtual wire have been applied.
- Verify the destination tenant network and VLAN network are in the "Running" state and reside on the same physical node.
- Ensure VLANs are trunked to the correct physical node ports.
Document Information
- Last Updated: 2024-09-03
- VergeOS Version: 4.12.6