The VergeOS VMware feature provides a direct interface with vSphere (storage independent) to run a backup agent for VMware virtual machines. The VergeOS agent initiates snapshots, with the ability to access both full and incremental backups for either a one-time import or ongoing backup and DR for vSphere environments.
- Create a VMware Service (This creates a direct connection to the vSphere environment.)
- Create Schedule(s).
- Assign Schedules to VMs (different schedules can be assigned to different VMs.)
The first step to creating a backup/import of VMware VMs to VergeOS is to create a VMware Service.
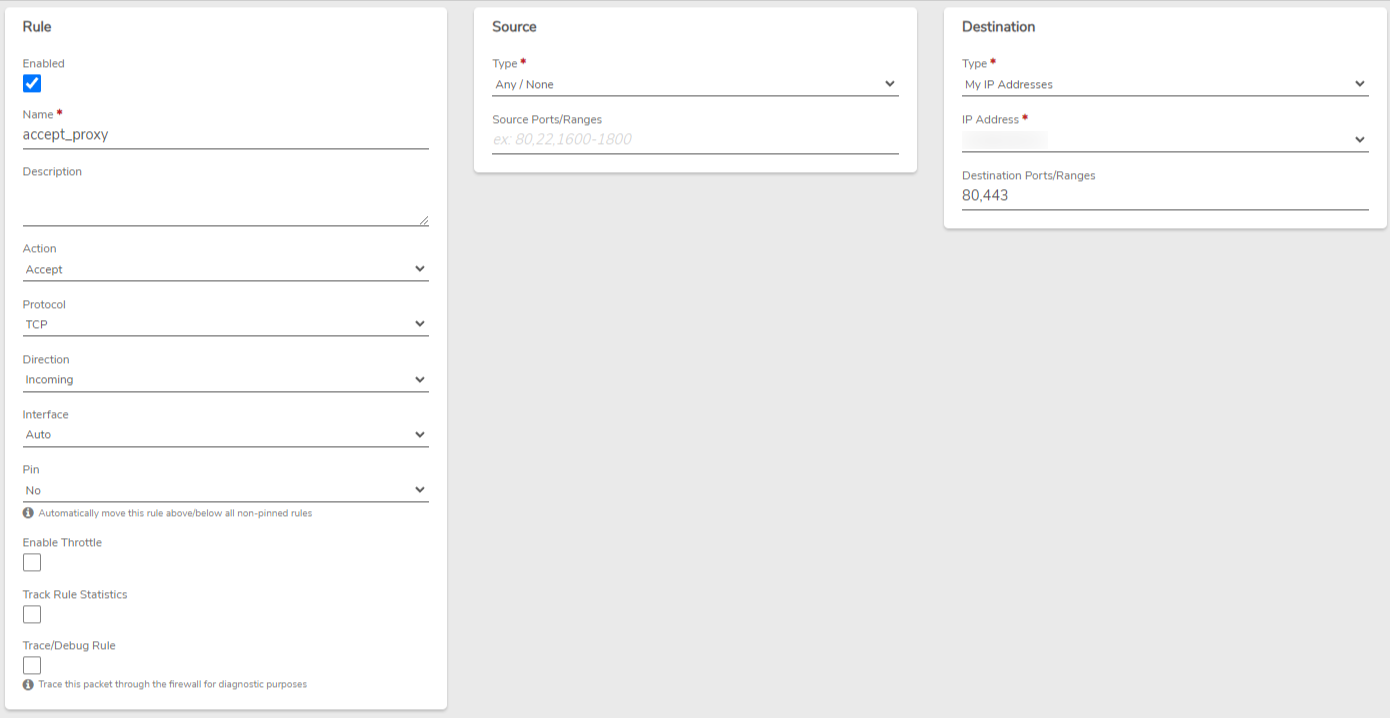
The VMware service establishes a direct agent connection with vSphere; network access and admin login credentials to the vSphere environment is required.
- Navigate to Import/Export > VMware Services from the top menu.
- Click New Service on the left menu.
- Enter a Name for the VMware service (required).
- Typically, it is recommended to keep the 2 cores and 2GB RAM default settings in place; this will be suitable for almost all situations.
- Optionally, a specific Cluster can be selected (or leave as --Default--).
- Optionally, a Failover Cluster can be selected (or leave as --Default--).
- Optionally, a Preferred Node can be selected on which to run this service (or leave as --None-- for the system to select Node.)
- Optionally, enter a Description to record additional information, if desired.
- Select desired On Power Loss setting:
- Last State - Service will only be powered on if it was on at the time of power loss.
- Leave Off - Service will not be powered on when power is restored (regardless of its state at the time of power loss).
- Power On - Service will be powered on when power is restored (regardless of its state at the time of power loss).
- Select a Network on which to run the VMware service.
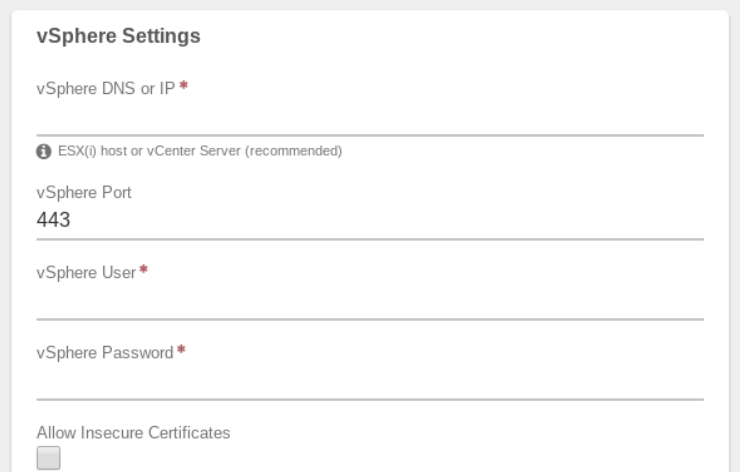
- Enter the vSphere DNS or IP (required). The address should be reachable from the network selected for the service.
It is recommended to connect to the vSphere cluster rather than an individual ESX(i) node.
- The default vSphere Port is 443; this is the typical listening port for VMware client connections. Change to alternate port if needed.
- Enter the vSphere User name.
- Enter the vSphere Password for the above user.
- The Allow Insecure Certificates option can be selected if the vSphere address is not using a certificate signed by a certificate authority (e.g. self-signed certificates).
- Click Submit to save the new service.
- You are returned to the VMware Services listing where the new service will appear. Click the Service to select it.
- Click Power On on the left menu to start the service and attempt connection to vSphere.
After the service is started, double-click to bring up the VMWare Service Dashboard.
Once the service is powered on, advanced vSphere settings can be changed, if desired.
Default settings will be appropriate for most installations.
Click Edit on the left menu.
- Max Concurrent VM backups - the number of simultaneous VMware backups. The default setting (4) is typically appropriate; however, this number can be increased to speed up backup processes from Vsphere systems with high CPU resources and adequate available bandwidth. Conversely, this setting can be reduced for systems with lower CPU resources/lower available bandwidth.
- Name for the auto-created snapshot during backup - the name given to the temporary, VMware-created snapshot used during the backup operation.
- Default VM backup schedule - defines the backup schedule to be assigned automatically to all new VMware VMs discovered by the service. Initially, this is set to --None-, which will set new VMs to use no Schedule (no backups) by default. After Schedules are created, the default can be changed to assign a specific backup schedule to any newly detected VMs.
- Automatically enable change tracking per VM - this setting will automatically turn on the VMware CBT (changed block tracking) feature for each VM included in differential and thin-provisioned backups. By default, this setting is enabled (Enabled is recommended). If this setting is disabled, and CBT is not otherwise enabled on VMware, a differential backup will default back to a full backup (backup logs will indicate this change.)
- Backup storage tier - the VergeOS storage tier in which to store backup data. By default, this is set to tier 4. Note: Changing this setting affects new Full Backups only. (In other words: if a backup has already taken place to a different tier, differential backups will continue to be stored in that tier; the new setting will take effect as soon as another Full backup is performed.
When vSphere settings have been changed as needed, click Submit.
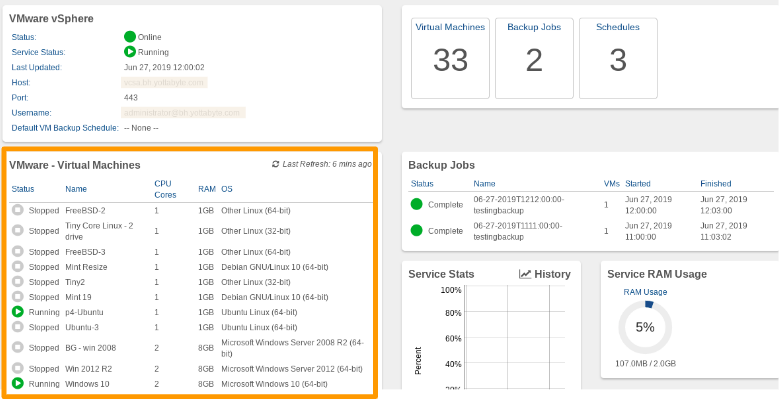
- Click Refresh VMs on the left menu to discover VMware Virtual Machines. This will initiate a connection to the vSphere system and detected VMs will appear in the VMware Virtual Machines section of the page.
On the Dashboard, check the Status (top left). If the service successfully connected to the vSphere system, the status will show as Online and Running.
An Error Status indicates the connection was not made due to: incorrect login credentials, insecure SSL (without enabling the option for insecure SSL), invalid address, or a network issue reaching the VSphere system.
See Appendix A: Troubleshooting Connection Errors for more information.
A schedule is a grouping of backup Tasks. A single schedule might include various backups, such as hourly, daily, weekly and monthly backups, and allow for taking backups at different intervals, each with different retention rules. Additionally, different types of backups can be included within the same schedule: Full (thick provisioned), Full (thin provisioned), and Differential.
Different schedules can be created to be applied to different VMs, for example a general schedule could be used for production VMs, while a less rigorous schedule is applied to development and testing VMs; yet another schedule that includes frequent backups with shorter retention might be applied to SQL VMs, etc.
When a new VMWare Service is created, a Schedule named “Default” is created automatically. This Schedule can be modified to fit your organization’s needs. You can also create any number of new Schedules.
- From the VMware Service Dashboard (Import/Export > VMware services > double-click the target service from the list.)
- Click Schedules on the left menu.
-
Click New on the left menu.
-
Enter a Name for the new Schedule.
- Optionally, a Description can be entered to record more information.
- Click Submit.
- The Schedules list will appear. Double-click the new Schedule.
At this point the Schedule is just an empty container; one or more tasks need to be added to the Schedule.
-
Click New Task on the left menu or click the + Add Task option on the Schedule Dashboard.
-
Enter a descriptive Name for the Task (for ex: Midnight_7days; weekly_1monthretention; yearly_perpetual, etc.)
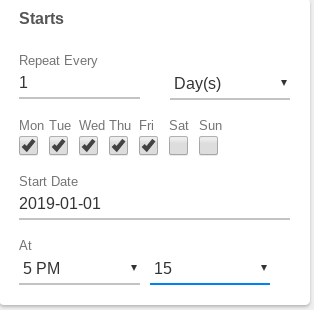
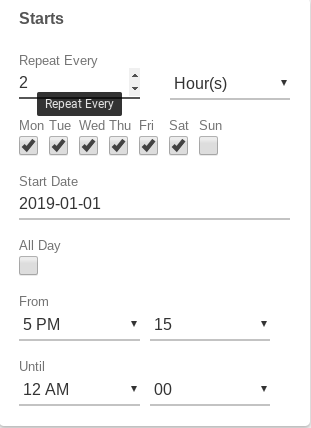
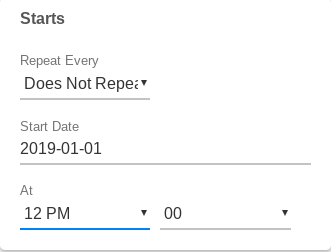
- Select the desired Scheduling for the backup Task. (Granular options allow for great flexibility in task scheduling.)
Ex: Every weekday at 5:15 PM
Ex: Every 2 hours, from 7 AM - 5 PM, except for Sunday:
Ex: Monthly, on the last day of the month:
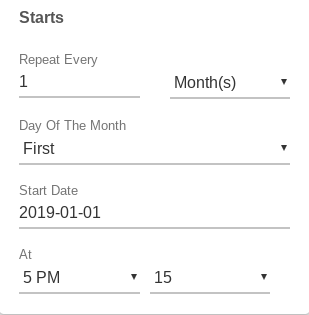
Ex: One time only, on 2019-04-01 at Noon:
-
By default, a recurring Task is set to run perpetually. Optionally, a Task Expiration can be defined which will cause the Task to cease on the selected date and time. To set an expiration for the Task: De-select the Never checkbox and enter desired expiration date and time.
-
By default, the Backup Job Name will default to:
ScheduleName - TaskName-YYYY-MM-DD HH:MM (ex: prodschedule - hourly - 2019-01-29 11:00 for a backup created from the “prodschedule” schedule, “hourly” task, at 11 AM). Optionally, a Backup Job Name can be defined and can include any combination of these formatted date variables:
- %Y 4-digit year
- %m 2-digit month (01 to 12)
- %d 2-digit day of the month (01 to 31)
- %H 2-digit hour (24-hour clock)
- %M 2-digit minute (00 to 59)
Example: The entry: “%m-%d-%Y:%H%M-sqlbackup”, run on Jan 26, 2019 at 11AM produces a backup named “01-26-2019:11:00-sqlbackup”
- Select the desired Backup Job Retention; this is the amount of time to keep the backup. (Units that can be selected: Minutes, Days (default), Hours, Years, Forever).
After a backup is run, the expiration of individual Backup Job instances can be modified manually; backup job instances can also be manually deleted before the expiration date/time.
-
The Quiesce Snapshots option can be selected to invoke the VMWare quiesce feature (Note: VMware Guest Tools required.) When this option is enabled, VMWare pauses running processes on the guest operating system so that the file system contents are in a known consistent state when the snapshot is taken; this process might include such operations as flushing dirty buffers from the Operating System’s in-memory cache to disk, or other application-specific tasks. Consult VMware documentation for more information about the quiesce feature.
-
Optionally, Minimum Backup Jobs to Keep can be selected. This setting overrides Individual backup expirations to keep the specified minimum number of backups (most recent) in place. This can provide a safety-net, intended to prevent all backups from expiring before new backups are created: for situations such as a system being powered off for a period of time or an interval of backup errors.
-
Select a Backup Mode.
- Differential - only transfers changes since the last Full VMware backup. Because of the way that differential backups are stored in the vSAN, a differential backup can be used directly and does not rely on a full backup or other differentials for a restore operation.
This requires Changed Block Tracking (CBT) enabled on vSphere VMs.
- Full Backup (Thick provisioned) - Full Backup, requesting all blocks from VMware.
- Full Backup (Thin provisioned) - Full Backup, requesting only allocated blocks from VMware.
This requires Changed Block Tracking (CBT) enabled on vSphere VMs.
* Differential and Thin Provisioned Full backups utilize the CBT vSphere feature. Please see Appendix B for information and considerations regarding this feature.
A Full backup is needed initially and should also be done on a regular basis. Differential backups are quicker and use fewer resources/bandwidth as only changes since the last full backup are requested. A prudent strategy will include performing full backups regularly (ex: daily, weekly, bi-weekly), with differential backups at intervals in between.
- When the Task is configured as desired, click Submit.
- You are returned to the Schedule page and the new task will appear in the Tasks section. Click the + Add Task button and repeat the above steps to append additional tasks to the schedule.
Once the VMware service is created and successfully connects to the VSphere system, the list of discovered VMware Virtual Machines will appear on the VMware Service Dashboard.
 By default, all VMs have their schedule set to --None--.
- From the VMware Service Dashboard, click Virtual Machines on the left menu.
- Select the desired VM(s) from the list. (Selected VMs show a checked box on the left.) Hint: If you’d like to select all VMs in the list, click the checkbox in the upper left corner.
-
Click Edit Backup Schedules on the left menu.
-
Select the Schedule from the dropdown list and click Submit.
- The Backup Schedule assigned to each VM is displayed in the VMware VMs listing.
The default VM Backup Schedule can be defined to automatically assign a backup schedule to all new VMware VMs discovered by the service.
- From the VMware Service Dashboard, click Edit on the left menu.
- In Default VM Backup Schedule, select the desired Schedule from the dropdown list.
- Click Submit to save the change.
The Default Backup Schedule is displayed on the VMware Service Dashboard.
Manual backups can also be performed on VMs using the VMware service; this can be helpful in creating a backup immediately before maintenance work, such as a guest OS upgrade, application update, or other configuration changes.
- From the VMware Service Dashboard, click Virtual Machines on the left menu.
- Select one or more VM(s) in the list. (Hint: to select all VMs click the checkbox in the upper left corner.)
- Click Backup on the left menu.
- A Confirmation dialog will appear; click Yes to proceed with the backup.
- Return to the VMware Service Dashboard (Hint: you can use the breadcrumb at the top or the browser back button to return to the Service Dashboard.)
- Click Backup Jobs on the left menu.
The Manual Backup should appear at the top of the listing and will display a status of “Running” until it is finished, at which point the status will show as “Complete”.
For manual backups, the Name displayed will be the name of the first VM selected for backup, and the Schedule Task column will indicate a Manual backup. Additional columns display the Number of VMs backed up (VM Count), Started and Finished time and, the Expires setting for the backup.
-
Double-click the Backup Job in the listing.
-
The Backup Job Dashboard displays. Click Edit on the left menu.
- Make changes to Name/Expires fields as desired.
- Click Submit to save the changes.
- Double-click the Backup Job in the listing.
- The Backup Job Dashboard displays. Click Delete on the left menu.
- Click Yes to confirm the delete operation.
The VM is imported to the VergeOS environment (From the Backup Job Dashboard, double click the individual VM -> click Import VM.)
VM is powered on in the VergeOS environment where files can be extracted to the VergeOS NAS and accessed via CIFS or NFS.
Individual VMs or entire VMware system backups can be pushed back to the VMware environment.
VMware VMS are powered up in VergeOS from the backup. Built-in Site-Sync provides the mechanism to synchronize VMware backups offsite to be prepared for quick recovery in the event of a disaster or primary facility outage.
Note: Check Logs (at the bottom of the Dashboard page) for possible additional information.
The built-in Diagnostics engine can assist in testing the network connection. (VMware Services Dashboard -> View Service -> Diagnostics)
Differential and Full(Thin Provisioned) backups utilize VMware’s CBT feature, to request only blocks that have changed since the last full backup, or blocks in use. This can provide for quicker operations that utilize less bandwidth. (There is a VergeOS option to automatically turn on CBT for all VMs.) The following VMware KB article provides more information, including VMware requirements for using CBT: https://kb.vmware.com/s/article/1020128_
Utilizing CBT to provide faster and more efficient backups is generally fine. However, it is important to consider that defects in CBT can compromise backups that have utilized the feature. This is a source issue that is not controlled by any third-party agent accessing VMware for backup.
The following strategies are recommended to mitigate potential risks posed by using the CBT feature:
- As a VMware customer/user, stay abreast of known issues and apply available updates and patches as they become available. In the past, there have been bugs involving the CBT feature, for which VMware has provided patches to fix known CBT defects.
- Although VergeOS stores all backups in the vSAN such that they are stand-alone (any backup, including differential, can be used directly and does not rely on another backup for restore operations), a prudent backup strategy will include a schedule of both Full backups and Differential backups in between. For example, a common schedule used by many organizations is to run a Full backup weekly or twice weekly and differentials on days in between.
- When possible, use Full-Thick Provisioned backup for those that are intended for long-term retention.
Document Information
- Last Updated: 2024-09-03
- VergeOS Version: 4.12.6

.png)