Configuring Proxy
Using a Proxy grants the ability to use 1 IP address for multiple Tenant environments by mapping FQDN hostnames. This bypasses the need to have 1 IP address per tenant and helps to preserve ipv4 addresses.
Enabling Proxy#
- From the external network used to access tenant environments:
- Select Edit in the left menu.
- Enable Proxy.
- In most cases, the Proxy Listen Address field can be left blank. This will default to
0.0.0.0, meaning it will listen on all addresses.
For VergeOS verions 4.12.6 and older
'Bind DNS' will need to be temporarily enabled if it is not already in use on the network. This will expose the IP Alias selection in the UI (step 2).
- Submit the settings but DO NOT RESTART THE NETWORK OR APPLY RULES YET!
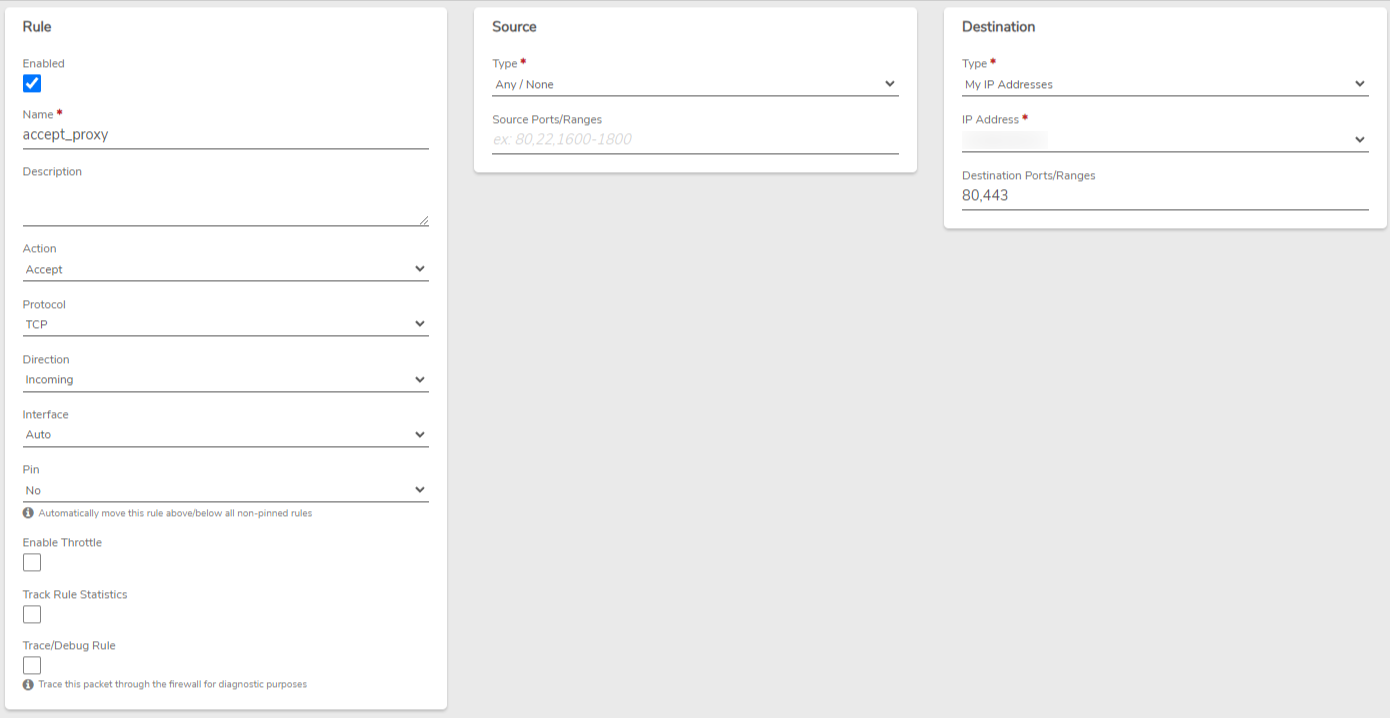
- From the same external network: - Select IP Addresses in the left menu. - Edit or create an IP Address, setting the Type to IP Alias. - Submit. - Set the external network DNS back to the original setting (Prior to Version 4.12.4). - Select Rules. - Create a new rule that looks like the following image:
- Restart the network and apply the rules.
- Test the rule by opening a browser tab and navigating to the URL using the IP Alias address assigned in the previous step. If it works properly, the UI login page will open on the IP Alias address.
Creating a New Tenant with Proxy#
- Create an A Record for the new tenant in your domain registrar to point to the assigned IP Alias.
- Create a new tenant: - Enter all desired settings, leaving the URL blank.
- In the UI Management tab of the tenant creation page, select Create a new FQDN.
- In the Proxy Tenant Config page: - Select the network the proxy service is running on. - Select the tenant name. - Enter the FQDN of the tenant (the A Record created in step 1). - Submit.
- Select Skip at the bottom of the UI Management page to avoid assigning an IP directly to the tenant.
A tenant cannot have a UI IP address AND a proxied FQDN.
-
In the new tenant dashboard, select Apply Proxy in the highlighted warning.
-
Start the tenant and navigate to its URL in a browser tab to log in.
Editing an Existing Tenant to use Proxy#
- Create an A Record for the tenant in your domain registrar to point to the assigned IP Alias (if one does not already exist).
- From the tenant dashboard, select Edit in the left menu: - In the UI Address field, select None.
- Navigate to the network running the proxy service: - Select Proxy in the left menu.
- From the Proxy Dashboard: - Select View Tenants. - Select New.
- In the Proxy Tenant Config page: - Select the network the proxy service is running on. - Select the tenant name. - Enter the FQDN of the tenant (the A Record created in step 1).
-
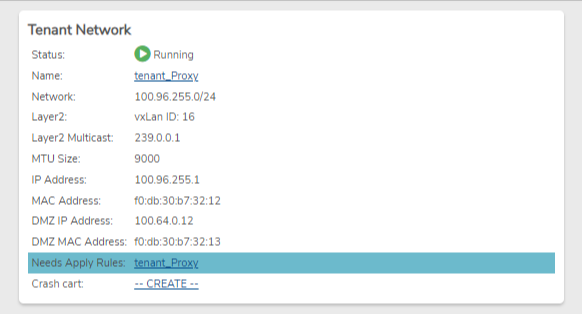
Navigate to the tenant dashboard and select Apply Proxy in the highlighted warning.
-
Select the tenant network (highlighted) from the tenant dashboard.
-
Select Apply Rules in the highlighted warning.
-
Test access to the tenant by navigating to its URL in a browser tab.
Document Information
- Last Updated: 2024-08-29
- vergeOS Version: 4.12.6