Skip to content

Automation#

Automation Example

Send Slack Channel Notification and Email Alert on Sync Error

Key Points

  • The VergeOS Task Engine allows you to automate operations, triggered by specific system conditions, events, or scheduled times. Using modular, reusable components (tasks, events, schedules, and webhooks) you can easily configure automation tailored to your environment.
  • The following example demonstrates how tasks, events and webhooks work together to automatically send simultaneous alerts (Slack channel and email) in response to any error generated by a sync operation.

Use Case

Administrators of a DR/BC service provider need to be notified immediately if a nightly sync job encounters errors. Early notification gives them time to investigate and attempt remediation, increasing the likelihood that they can reinitiate the sync and complete it within the available synchronization window.

The company uses multiple redundant alerting systems to notify administrators of critical issues: one system delivers alerts via email, while another posts messages to a dedicated Slack channel.

Using VergeOS Task Engine components, administrators can instantly trigger alerts in both systems whenever an important sync job reports errors. The automation consists of a webhook, two tasks, and an event. The steps below walk you through the full configuration:

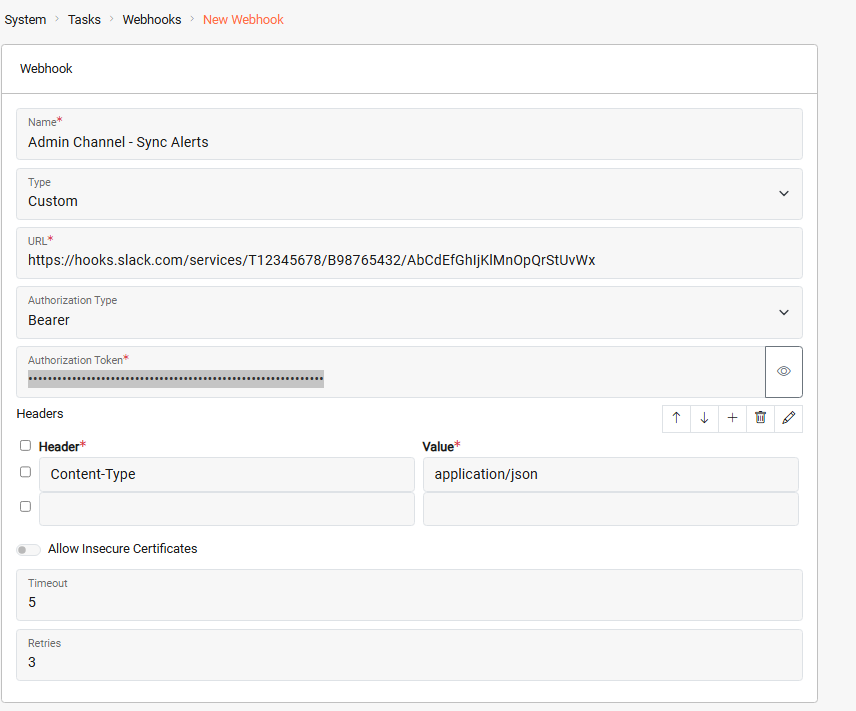
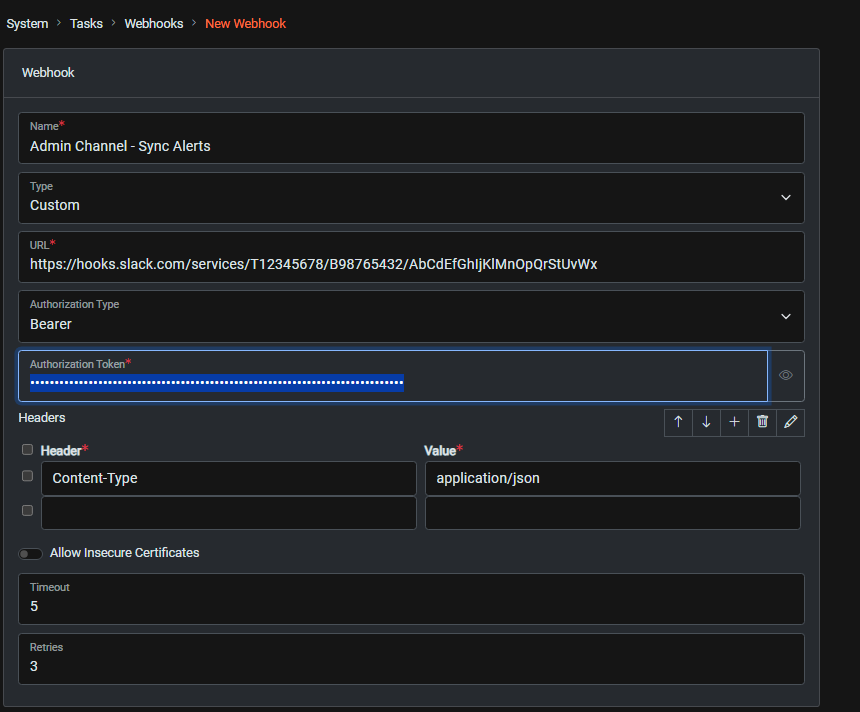
1. Configure the Webhook

The webhook defines the target URL and authentication method required by the external Slack system.

System > Tasks Dashboard > New Webhook

Create webhook - Light Mode Create webhook - Dark Mode

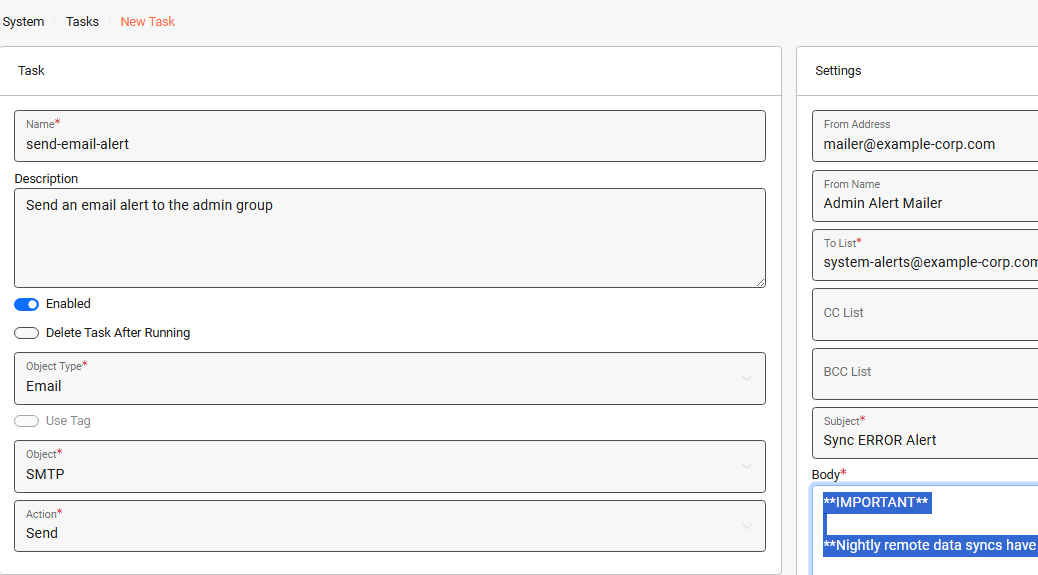
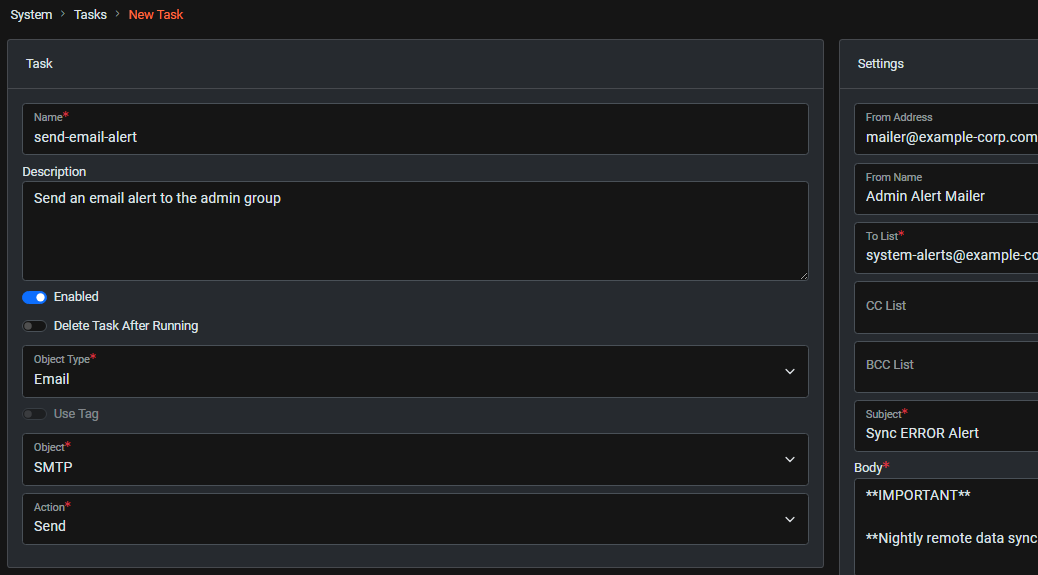
2. Create a Task to Send the Email

This task defines the email alert that will be sent.

System > Tasks Dashboard > New Task

Create webhook - Light Mode Create webhook - Dark Mode

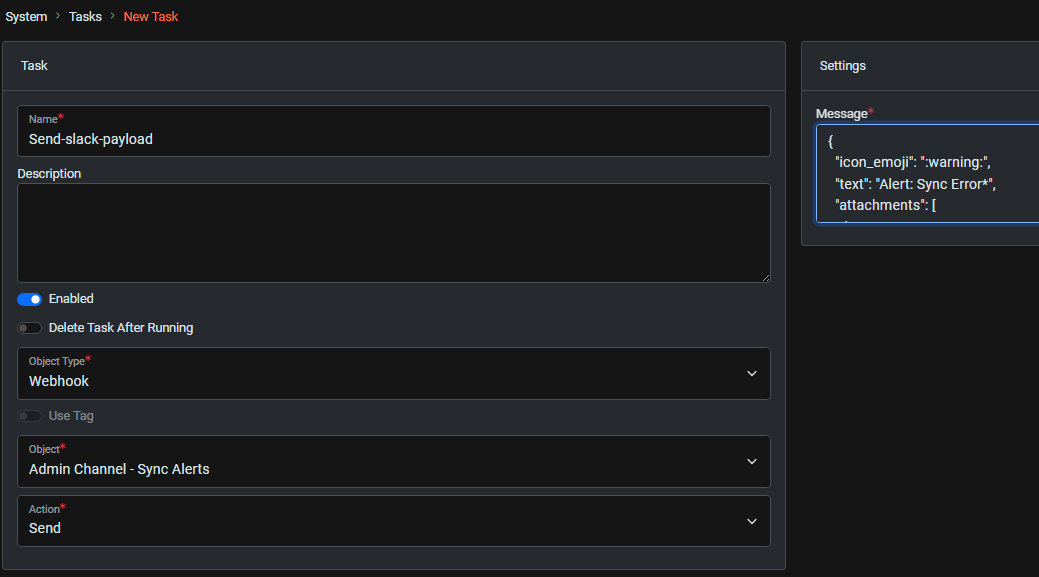
3. Create a Task to Send the Webhook

This task defines the message payload that will be sent to Slack via the webhook.

System > Tasks Dashboard > New Task

Create Slack webhook task - Light Mode Create Slack webhook task - Dark Mode

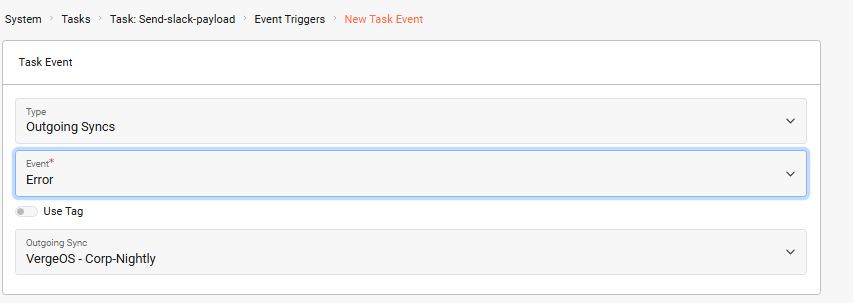
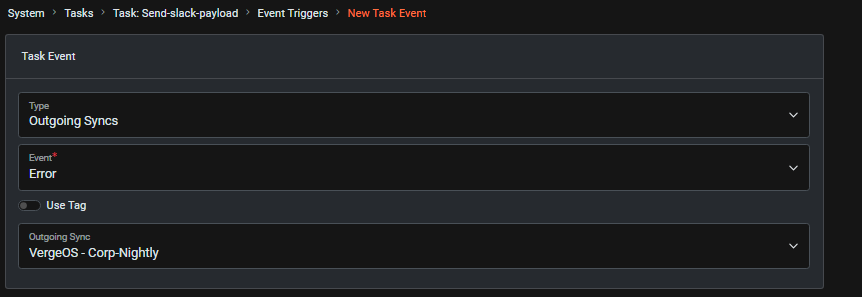
4. Assign an Event Trigger to the Send-slack-payload Task

Assigning an event trigger allows us to specify the condition (a sync error) that will fire the task.

From the Send-slack-payload task dashboard: Event Triggers > New

Assign Event Trigger to Slack Task- Light Mode Assign Event Trigger to Slack Task- Dark Mode

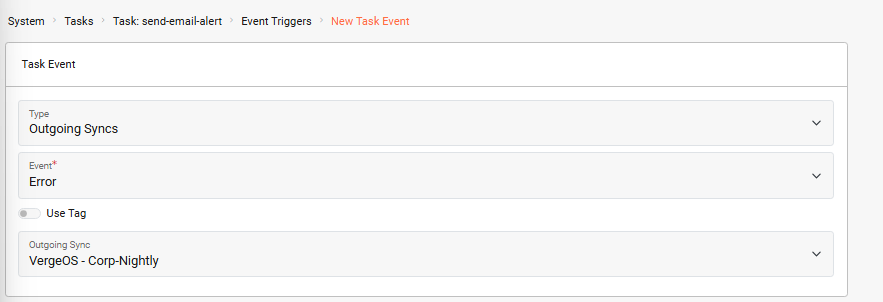
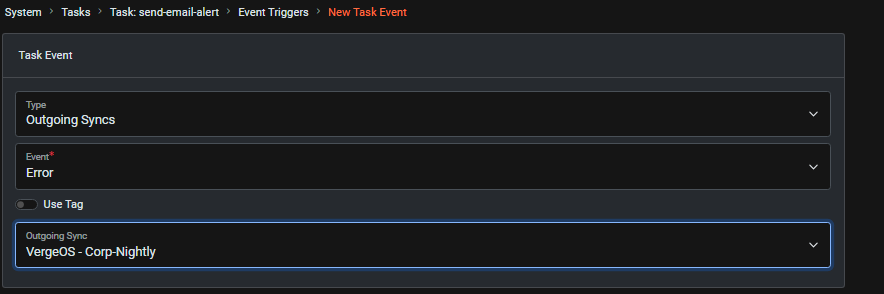
5. Assign an Event Trigger to the 'send-email-alert' Task

We apply the same event trigger to this task so that the email alert is also sent when there is a sync error.

System > Tasks Dashboard > Tasks > select the send-email-alert task > Event Triggers > New

Assign Event Trigger to Email Task - Light Mode Assign Event Trigger to Email Task - Dark Mode

This automation ensures that administrators are notified immediately when a sync job encounters an error, allowing them to act promptly, providing the best chance to resolve the issue before the synchronization window closes.

Triggers Based on Multiple Objects

In this example, the trigger is tied to a single outgoing sync. If you want the same trigger to apply to multiple, or even all, outgoing sync jobs, assign a shared Tag to those syncs. You can then configure the trigger to fire whenever any sync with that tag produces an error.

Troubleshooting

Common Issues

  • Webhook not firing: Verify the webhook URL is correct and the external service (Slack) is accessible from your VergeOS environment.
  • Email not received: Check that SMTP settings are properly configured under System > Settings > SMTP.
  • Event trigger not activating: Ensure the trigger is assigned to the correct sync object and the event type is set to "Error".

Additional Resources

Feedback

Need Help?

If you need further assistance or have any questions about this article, please don't hesitate to reach out to the VergeOS Support Team.

Power on/Power off VMs Based on User Login/Logout and Schedule

Automated Task Example

Key Points

  • The VergeOS Task Engine allows you to automate operations, triggered by specific events or scheduled times. Using modular, reusable components (tasks, events, schedules, and webhooks) you can easily configure automation tailored to your environment.
  • The following example displays the use of tags, tasks, events and schedules used together to seamlessly bring workloads online and offline as they are needed, improving resource efficiency.
Use Case

User JThompson relies on multiple GPU-powered virtual machines to perform 3D modeling and animation work. These VMs consume significant compute and memory resources, and leaving them running when idle is wasteful.

By configuring automation to power them on only when needed - when JThompson logs into the system, and to shut them down when the user logs out or at a scheduled time (for example, every Friday at 6pm), we can ensure that resources are available exactly when needed while avoiding unnecessary usage.

The automation consists of creating tags, defining tasks, and attaching event and schedule triggers. The steps below walk you through the full configuration:

1. Create a Tag Category and Tag

A tag category organizes related tags. We then create a specific tag within that category to designate the VMs to control with this automation.

System > Tags > New

Create tag category - Light Mode Create tag category - Dark Mode

Double-click category created above > New

New tag - Light Mode

New tag - Dark Mode

2. Assign the Tag to the VMs to Automatically Power On/Off

This will identify the VMs that should be controlled by the automation.

Virtual Machines > List > select VMs > Assign Tags > select the tag from above

Assign tag to VMs - Light Mode

Assign tag to VMs - Dark Mode

The VMs will now show the assigned tag in the Tags column.

VMs with tag - Light Mode

VMs with tag - Dark Mode

3. Create a Task to Power On VMs

This task defines the action of starting up the tagged virtual machines.

System > Tasks Dashboard > New Task

Task to power on tagged VMs - Light Mode

Task to power on tagged VMs  - Dark Mode

4. Configure an Event Trigger for User Login

Here we define the activity that will invoke the task (JThompson logs into the system).

From the new task dashboard: Event Triggers > New

Event trigger user login - Light Mode

Event trigger user login - Dark Mode

5. Create a Task to Power Off the VMs

This defines the action of powering down the tagged virtual machines.

System > Tasks Dashboard > New Task

Task to power off tagged VMs - Light Mode

Task to power off tagged VMs - Dark Mode

6. Configure an Event Trigger for User Logout

This configures the task to launch when JThompson logs out.

From the new task dashboard:
Event Triggers > New

Event trigger user logout - Light Mode

Event trigger user logout - Dark Mode

7. Create a Schedule for Fridays at 6:00pm

Creating a schedule allows us to define specific dates/times. After creating the schedule it can be applied to our task and other tasks.

System > Tasks Dashboard > New Schedule

Schedule COB - Light Mode

Schedule COB - Dark Mode

8. Create a Schedule Trigger for the Power Off

We apply the schedule (Fridays at 6pm) to the task to automatically power off the VMs every Friday evening.

From the dashboard of the new task:
Schedule Triggers > New

Schedule trigger - Light Mode

Schedule trigger - Dark Mode

Verification

  • Log in as JThompson → tagged VMs should power on automatically
  • Log out → VMs should power off
  • At Friday 6:00pm → VMs should power off even if the user is still logged in

Troubleshooting

  • If VMs do not power on, verify the tag is assigned to each VM.
  • If schedule triggers do not fire, confirm the system time zone is correct.
  • If login/logout triggers fail, ensure the user account name matches exactly.

This automation ensures that the GPU‑powered VMs are only active when the designated user is logged in. When the user logs out, or at the scheduled cutoff time (Friday 6pm), the VMs are powered down to conserve resources. The pattern can be applied to other high‑resource workloads such as integration test environments, interactive machine learning, CAD rendering stations, or financial modeling clusters, or any system that benefits from running only when needed.

Settings that Influence VM Node Selection

Each time a VM is powered on or migrated, the system decides where to run the VM based on user-specified VM options as well as balancing workloads across available nodes.

VM options used in deciding node selection for running a VM:

  • HA Group

    • Node Affinity: (value starts with a "+", e.g. "+commapp") The system attempts to run VMs with the same HA Group value on the same node. This is used to coalesce application-related workloads to a single physical node for performance optimization.
    • Node Anti-affinity: (value does NOT with "+", e.g. "webservers") VMs with the same HA Group value are run on separate nodes to provide high availability of applications or services.
  • Preferred Node: a specific node is selected as the first-choice

  • Preferred Cluster: nodes in specified cluster used as first choice
  • Failover Cluster: nodes in specified cluster used as next choice when preferred cluster is not available

For more information about these and other VM options, see: Product Guide - Virtual Machine Fields

Terraform VergeIO Provider

The Terraform VergeIO Provider enables the integration and automation of VergeOS infrastructure with Terraform. It allows users to define, manage, and scale VergeOS resources as part of Infrastructure as Code (IaC) workflows.

For the latest provider documentation and examples, please refer to the following:


Example Usage

For more detailed usage examples, check the docs folder in the GitHub repository.

Example Configuration

provider "vergeio" {
  host     = "https://some_url_or_ip"
  username = "my_user"
  password = "my_password"
  insecure = false  # Use true if using self-signed SSL certificates
}

resource "vergeio_vm" "new_vm" {
  name        = "NEW VM"
  description = "NEW TF VM"
  enabled     = true
  os_family   = "linux"
  cpu_cores   = 4
  machine_type = "q35"
  ram         = 8192
}

Initializing and Applying

To apply the configuration:

terraform init && terraform apply

Configuration Reference

host (Required): URL or IP address for the VergeOS system or tenant.
username (Required): Username for the VergeOS system or tenant.
password (Required): Password for the provided username.
insecure (Optional): Set to true for systems using self-signed SSL certificates.

Resources

The following VergeOS resources can be managed via Terraform:

vergeio_drive
vergeio_member
vergeio_network
vergeio_nic
vergeio_user
vergeio_vm

Data Sources

The following data sources are available for querying VergeOS resources:

vergeio_clusters
vergeio_groups
vergeio_mediasources
vergeio_networks
vergeio_nodes
vergeio_version
vergeio_vms

Testing a Sample Configuration

To test your configuration, create a main.tf file in your Terraform workspace:

terraform {
  required_providers {
    vergeio = {
      source = "vergeio/cloud/vergeio"
    }
  }
}

provider "vergeio" {
  host     = "https://someURLorIP"
  username = "username"
  password = "password"
}

resource "vergeio_vm" "new_vm" {
  name        = "NEW VM"
  description = "NEW TF VM"
  enabled     = true
  os_family   = "linux"
  cpu_cores   = 4
  machine_type = "q35"
  ram         = 8192
}

Then, run the following command:

terraform init && terraform apply

Document Information

  • Last Updated: 2024-09-03
  • VergeOS Version: 4.12.6